Long-distance motorcycle touring is about freedom, rhythm, and endurance. Hours on the highway, changing weather, unfamiliar roads, and constant wind noise all test your gear — especially the communication system for touring. A touring motorcycle intercom is not the same as a short-ride or commuter intercom. On a multi-day trip, small weaknesses become big problems: […]
6 Professional Steps to Clean Motorcycle Helmets
The helmet for your motorcycle ranks as crucial gear. It shields your noggin and keeps you out of harm's way should you take a spill. As it rubs up against your skin and gets exposed to sweat and the elements, your lid could end up grimy, reeking, or worse, break down with time. At this time, it becomes extremely important to clean motorcycle helmets.
We're gonna walk you through the right moves to spruce up and keep your motorcycle helmet tip-top in this blog. Stickin' to this routine means your helmet's not just gonna last longer, it's also gonna ensure a snug and hazard-free ride for you.
Table of Contents
Why Clean and Maintain Your Motorcycle Helmet?
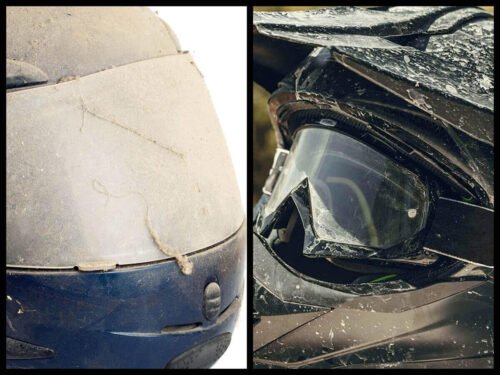
dirty helmets
Regular cleaning and maintenance are essential for several reasons:
- Safety Comes First: Keep your helmet clean to make sure it works the best way possible. The inner lining can get weak if it's dirty with sweat, oil, and all that. And if that happens, it might not be so good at taking a hit. A well-maintained helmet is more reliable in an emergency.
- Comfort: If you wear your helmet a bunch, it's gonna get all grimy with sweat and oils on the inside. That grime can bug you, make your helmet smell bad, and even mess with your skin. Washing it a lot means you keep your head space neat and snug.
- Keep It Going: Looking after your helmet by cleaning it right can make it last longer. Getting rid of the nasty stuff and making sure it's not ruined by strong cleaning things or being kept the wrong way means your helmet stays in top shape for more time.
- Hygiene: Your motorcycle helmet touches your hair, your skin, and sometimes the rain or the sun. Making sure it gets a good scrub often cuts down on germs and stuff that can give you allergies. That way, your helmet stays clean and not full of icky stuff.
Step 1: Preparation—Clean Motorcycle Helmets
Proper preparation is key to a successful cleaning session. Follow these steps before you begin:
- Read the Owner’s Manual: Every helmet is different. Peek at the manual before cleaning to dodge any special care tips or no-nos. Doing this makes sure you don't do something that borks the warranty or wrecks your helmet.
- Get your cleaning spot ready: Pick a bright place where you've got room to move. A garage, kitchen, or bathroom is great if you want warm water close by. Spread out a fresh towel or cloth to keep your helmet from getting scratched up while you're on the job.
- Remove Accessories: Pull off stuff like helmet intercoms, chat gadgets, or visors that you can remove. Getting these bits out of the way means you can scrub down every inch of your helmet super well.
- Disassemble Removable Parts: If your helmet comes with liners inside, pads for the cheeks, or pads for the ears that you can take out, do it. Remember where each bit goes so putting it back together won't be a hassle. Certain helmets let you pull out all the padding inside to give it a really good scrub.
Step 2: Essential Tools and Cleaning Supplies
Get your cleaning gear ready before you tackle that helmet. Picking the right stuff means you won't wreck it, and every nook and cranny will get a safe scrub-down.

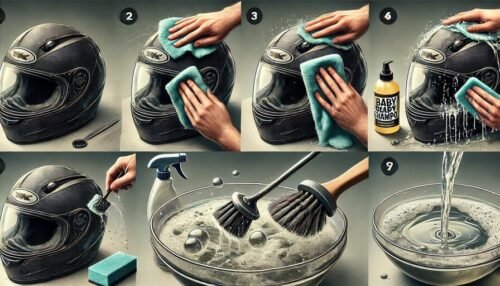
essential tools and cleaning supplies
Cleaning Tools
- Microfiber Rags: Perfect for the helmet, these are soft and awesome for scrubbing both inside and out.
- A Soft Toothbrush: Awesome for scrubbing those tiny gaps and tough spots on your helmet.
- Mesh Bag for Laundry: If your helmet has removable liners, toss them in a mesh bag to keep 'em safe in the wash.
Cleaning Supplies
- Mild Soap or Baby Shampoo: Use a gentle, non-abrasive cleaner. Baby shampoo is a popular choice because it is designed for sensitive skin and does not contain harsh chemicals.
- Warm Water: It's good stuff for getting rid of muck and gunk and won't mess up the helmet bits.
- Special Gear Scrubbers: The market has specific stuff you can grab to make your helmet neat. They're made for scrubbing up without messing up the sensitive bits like face shields or inner padding.
Stuff You Shouldn't Use
- Potent Solvent Sprays: Stay away from things like isopropyl or turpentine - they're no good for your headgear's squishy middle or plastic parts.
- Stuff with Ammonia: These cleaners are way harsh and could rub off the important shiny layer on your helmet's skin.
- Nasty Chemicals: Dodge any cleaner packing a heavy chemical punch. Those bad boys can make your helmet's strength go bye-bye.
Note: Using these supplies will ensure that your cleaning process is safe and effective. Always read the manufacturer’s manual for any specific cleaning instructions for your helmet model.
Step 3: Cleaning the Helmet’s Interior
Dig into your helmet's insides. The foam layers and pads hang out with your head's sweat, oil, and grime. You've gotta keep 'em clean.

clean the helmet’s interior
Removing the Liner and Pads
If your helmet allows it, remove the inner lining and cheek pads. Heads up, some helmets use straps or the sticky side of Velcro to keep those pads cozy so take it easy when you pull 'em out. Then plop 'em on something clean and won’t get 'em wet.
Machine Washing vs. Hand Washing
Machine Washing: Toss the bits you can take out into a bag meant for laundry. Hit the gentle cycle cooler than warm water, and just a touch of easy-on-the-fibers soap. Skip the soft stuff that makes your towels fluffy—it leaves a residue.
Hand Washing: Grab some warm water and mix in a bit of baby shampoo. Dunk those pads and liners in there, and give them a little swirl to get the sweat and grime out. For any tough spots, give them a good rub with a gentle cloth.
Drying the Interior
Once you've washed them, spread the liners and pads out to dry on their own. Stay away from the dryer—don't want to wreck the foam and sticky parts with that heat. Lay them flat on a fresh towel away from direct sunlight where there's plenty of air. It'll take a good chunk of your day so don't leave it till the last minute.
For helmets that cannot be removed
- Use a damp microfiber cloth soaked in a solution of warm water and mild detergent.
- Wipe the interior carefully, ensuring you do not saturate the foam.
- Use a soft brush to gently clean any textured areas.
- Allow the helmet to dry in a well-ventilated space, turning it upside down to let any moisture escape.
- Regular cleaning of the interior will help keep your helmet smelling fresh and maintain its cushioning properties.
Step 4: Cleaning the Helmet’s Exterior
The outer shell of your helmet not only provides protection but also enhances its appearance. Here are the steps to clean the outside of your helmet.
clean the helmet’s exterior
Wiping Down the Surface
Start by wiping the helmet with a damp microfiber cloth. This initial wipe helps remove loose dirt, bugs, and road grime. Use warm water for best results.
Using Mild Soap
Mix a small amount of baby shampoo or mild soap with warm water. Dip a microfiber cloth in the solution and gently scrub the helmet’s surface. Do not apply too much pressure, as vigorous scrubbing can scratch the surface.
Detailing with a Soft Brush
For areas with stubborn dirt, such as crevices or the helmet’s vents, use a soft-bristled brush. Brush gently to avoid damaging the helmet’s paint or finish.
Rinsing the Helmet
After cleaning, rinse the helmet thoroughly with clean water. Make sure all soap residue is removed, as any leftover detergent can affect the helmet’s durability over time.
Step 5: Cleaning the Face Shield, Sun Shield, and Vents

clean the helmet carefully
The face shield and other clear components of your helmet need special care to maintain their clarity and scratch resistance.
Cleaning the Face Shield and Sun Shield
- Wipe Gently: Use a soft microfiber cloth and a solution of warm water and baby shampoo.
- Avoid Abrasives: Do not use paper towels, as they can scratch the surface.
- Use Proper Products: If your visor has anti-fog or anti-scratch coatings, use products recommended by the manufacturer.
The sun shield, which protects your eyes from glare, should be cleaned carefully to avoid smudging. Wipe it gently with a damp microfiber cloth. Make sure no soap or residue remains, as this could affect visibility.
Cleaning the Vents
Dust and debris can accumulate in the helmet’s vents over time. Use a small brush or a cotton swab to clear out any blockage. In some cases, you can use compressed air on a low setting to blow out dust.
Step 6: Dry and Reassemble
After cleaning your motorcycle helmet, it's crucial to dry and reassemble it properly to maintain its integrity and ensure your safety.
Drying the Helmet Components
- Pat Dry: Gently press a clean, soft towel against the helmet's shell, padding, and straps to absorb excess moisture.
- Air Dry: Place all components in a well-ventilated, shaded area to air dry completely. Avoid direct sunlight or heat sources like hairdryers, as they can damage materials and adhesives.

dry the motorcycle helmet
Reassembling the Helmet
- Internal Padding and Liners: Once fully dry, reinsert the internal padding and liners, ensuring they fit snugly and align correctly within the helmet.
- Cheek Pads: Reattach the cheek pads securely, following the manufacturer's guidelines.
Visor and Accessories: Reinstall the visor and any other accessories, making sure all screws or clips are tightened properly.
Proper drying and reassembly are essential to prevent mold growth and ensure the helmet provides optimal protection during use.
Additional Maintenance Tips
Regular maintenance goes beyond just cleaning. Here are some extra tips to help you keep your helmet in top condition:
Regular Inspections
- Check for Cracks or Damage: Regularly inspect both the exterior and interior of your helmet for any signs of damage or wear. Cracks in the shell or worn-out padding can compromise safety.
- Inspect the Fasteners: Make sure that all straps, buckles, and fasteners are in good working condition. Replace any parts that appear worn or damaged.
Proper Storage
Keep It Out of Direct Sunlight: Prolonged exposure to direct sunlight can damage the helmet’s materials. Store your helmet in a cool, dry place when not in use.
Use a Helmet Bag or Case: Investing in a soft bag or a hard case for your helmet can protect it from dust, scratches, and accidental impacts during storage and transportation.
Avoid Extreme Temperatures: Do not leave your helmet in very hot or very cold conditions, such as in the motorcycle on a hot day or outside in freezing temperatures.
Odor Prevention
Use Helmet Liners or Skull Caps: Wearing a clean helmet liner or skull cap can reduce the buildup of sweat and oils on the interior.
Regularly Air Out Your Helmet: After a ride, if possible, remove the liner and let the helmet air out before storing it. This will help prevent the growth of bacteria and reduce unpleasant smells.
Timely Replacement of Parts
Replace Worn Liners: If you notice that the interior padding has degraded, consider replacing it. Some helmet manufacturers offer replacement pads and liners.
Monitor the Helmet’s Age: Even with proper maintenance, helmets should be replaced every 5 to 7 years, or after a significant impact, as the materials can degrade with time and exposure.
Common Mistakes to Avoid

common mistakes to avoid
Even with the best intentions, there are several mistakes motorcyclists often make when cleaning and maintaining their helmets. Here are some pitfalls to avoid:
- Using the Wrong Cleaners: Don't go for solvent-based cleaners rubbing alcohol, or stuff that's got ammonia in it. , these things will damage your helmet's inside and outside.
- Overwetting the Interior: Be careful not to soak the inner foam too much. If it gets too wet, you could wreck the liner and might even start a little mold or mildew party in there.
- Pay attention to the Drying Process: Don't skip letting everything dry all the way. If you put your helmet away with damp spots, those areas can end up getting damaged after a while.
- Not Following Manufacturer Guidelines: Every helmet has its own set of do's and don'ts when it comes to cleaning. If you don't pay attention to what the maker says, you might clean it wrong and then say bye-bye to your warranty, or worse wreck your helmet.
- Using Abrasive Materials: Always steer clear of rough fabrics or stiff-bristled cleaners for your "face shield" or helmet surface. They'll scratch or wear down the protective layers.
Avoiding these common mistakes will help you preserve the integrity and safety of your helmet.
Conclusion
It is part of the deal to take care of motorcycle helmets for motorcycle riders. A helmet that's kept in good shape, not only keeps you safer but also improves your ride by giving you coziness and a neat appearance.
The instructions above are easy for newbies and still complete for pros who want to max out the benefits from their equipment. Enjoy the roads!
More Knowledge about Helmets
How to Choose the Right Helmet: Type and Size
Full Face vs Open Face Helmet: The Truth About Motorcycle Safety
6 Different Types of Motorcycle Helmets You Should Know
Best Winter Motorcycle Helmet for Cold-Weather Riding
ATV Helmet vs Motorcycle Helmet: What's the Difference?
The Definitive Guide to Motorcycle Helmet Safety Standards
Are carbon fiber motorcycle helmets better?
What Is The Best Beginner Motorcycle Helmet?

Rodney L is a technical writer and product consultant with over a decade of experience in the motor industry. Rodney is a fan of performance machines that run fast and loud and an expert in all things custom. His numerous articles and write-ups are available at our knowledge base. Whether it’s something wrong with your motorcycle or you are building a custom bike, you can trust Rodney’s experience.
Subscribe
0 Comments
Oldest
You maybe like to read:
Best Adventure Bikes for Beginners (2026 Guide)
Adventure motorcycles, often called ADV bikes, are built to take you from smooth highways to rough backcountry trails. For new riders, picking the best adventure bikes for beginners can make all the difference. The right machine turns highways, gravel roads, forest tracks, and remote trails into places you actually want to explore, while the wrong […]
Best Motorcycle Intercom for Group Rides (2–20 Riders)
Riding in a group is thrilling, but without clear communication, even the best rides can turn chaotic. That’s where motorcycle intercom systems come in, letting you talk with your group, share GPS directions, listen to music together, and stay safer on the road. Whether you’re riding with a single friend or leading a pack of […]
Budget Motorcycle Intercoms from Fodsports: Honest 2026 Picks
I’ve used premium intercoms and budget ones on the same roads, in the same weather, on long touring days. The truth? Most riders don’t need a $400 system. Most riders still need the same basics: clear rider-to-rider talk, stable Bluetooth, and batteries that last a full day on the road. In 2026, budget motorcycle intercoms […]
2026 Best Motorcycle Intercom for Beginners from Fodsports
What is the best motorcycle intercom for beginners? If you’re a new rider, the idea of adding another piece of tech to your helmet can feel overwhelming. I’ve been using motorcycle intercoms for years—on solo rides, long tours, group trips, and daily commutes—and I’ll tell you this upfront: A beginner motorcycle rider doesn’t need the […]
Mesh Intercom vs Bluetooth Intercom: Which Motorcycle Communication System Is Better?
Mesh Intercom vs Bluetooth: Which Motorcycle Communication System Is Better? Mesh intercoms are best for riders who travel in groups because they automatically reconnect and stay stable, while Bluetooth intercoms are better for solo riders and two-up riding due to lower cost and simpler operation. As someone who both wrenches on bikes and rides long […]