Long-distance motorcycle touring is about freedom, rhythm, and endurance. Hours on the highway, changing weather, unfamiliar roads, and constant wind noise all test your gear — especially the communication system for touring. A touring motorcycle intercom is not the same as a short-ride or commuter intercom. On a multi-day trip, small weaknesses become big problems: […]
Stopping Distance Explained: 3 Tips to React Faster and Brake Better
When it comes to riding motorcycles, every second—and every foot—counts. Whether you're cruising through city traffic or riding along a quiet backroad, your ability to stop quickly can be the difference between a close call and a crash. That’s why understanding how to reduce your stopping distance isn’t just good practice—it’s a life-saving skill.
In this article, we’ll break down what stopping distance really means, what affects it, and share three proven techniques to help you react faster and brake more effectively.
Table of Contents
What Is Stopping Distance?
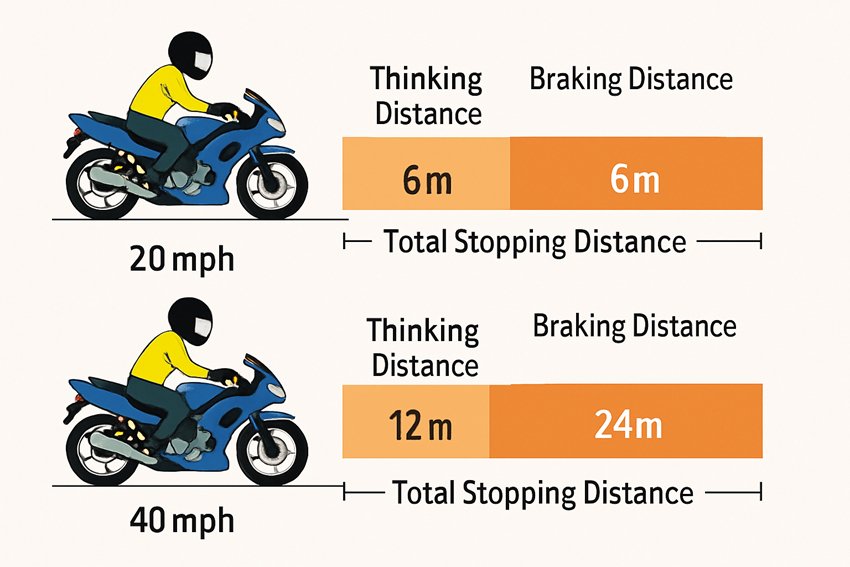
When a motorcycle user sees a hazard on the road, the stopping distance is the entire distance it takes for it to stop. It is equal to the thinking (reaction) distance plus the braking distance. That is, the bike goes a certain distance with the user noticing and responding, then another distance with the brakes reducing the bike's speed down to zero.
Small delays end up costing yards of asphalt – at 20 mph the bike may go a dozen or so metres before it comes to a halt (6 m thinking + 6 m braking), but at 40 mph that increases to around 36 m (12 m + 24 m).
motorcycle stopping distance
Notice how doubling speed doubles reaction distance but quadruples braking distance. This is why speed, road conditions, and alertness dramatically affect safety – at higher speeds your bike carries much more energy and needs far more space to stop.
Motorcyclists can generally stop in a shorter distance than cars due to lighter weight, but bikes are far more sensitive to traction loss on wet or loose surfaces. That’s why maintaining good technique and proper control is critical.
Motorcycle Stopping Distance Tips
✅ Tip 1: Cover the Front Brake
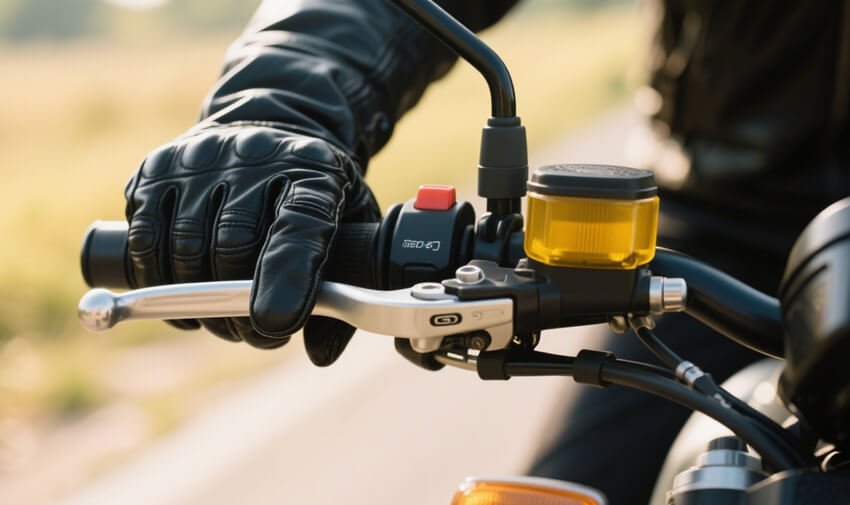
Cover the front brake
🟡 1. What Does It Mean to “Cover the Front Brake”?
- Definition: Covering the front brake means resting one or two fingers lightly on the front brake lever before you need to use it.
- Instead of wrapping all four fingers around the throttle, your fingers stay ready on the brake.
- Purpose: Reduces reaction time in emergencies — you can begin braking instantly without needing to move your hand.
🟡 2. Why Is This So Important?
- Milliseconds Matter: In a panic situation, even a half-second delay can mean several meters of extra travel at speed.
- Shorter Reaction = Safer Rider: You’re physically prepared to react the moment a hazard appears.
- Expert Insight:
“The moment spent reaching for the brake can be extremely costly because of the distance we’ve traveled in that time.”
🟡 3. Beginner Advice vs. Advanced Practice
Basic Training (Beginner Riders):
- New riders are often taught to cover the clutch and avoid touching the front brake.
The idea is to prevent accidental or abrupt braking, which can lead to instability.
Advanced Riders:
- Experienced motorcyclists almost always keep 1–2 fingers on the front brake.
- Real-world riding demands faster response than beginner techniques allow.
“Basic rider courses teach us to cover the clutch... but if we want to survive long enough to become experienced, we have to grow beyond a few of those things.”
🟡 4. How to Properly Cover the Front Brake
1. Finger Positioning
- Rest one or two fingers (usually index and/or middle finger) on the front brake lever.
2. Throttle Roll-Off
- Slightly roll off the throttle as you cover the brake.
This prepares the bike for smoother and more stable initial braking.
3. Smooth Initial Pressure
- Don’t grab or yank the front brake lever.
- The first 5% of brake pressure is crucial:
- It increases grip by loading the front tire and suspension.
- A smooth squeeze improves traction and control.
4. Build the Habit
- Practice this technique until it becomes second nature.
- Muscle memory ensures you’re not wasting time repositioning your hand when a hazard appears.
✅ Tip 2: Use Both Brakes Together
🟡 1. Why Use Both Brakes?
Front vs Rear Brake Roles
- Front brake = 70–75% of total stopping power.
- Rear brake = 25–30%, but plays a critical role in:
- Stabilizing the motorcycle.
- Preventing rear-wheel lift.
- Improving balance during braking.
Dual Braking = Maximum Control
- Applying both brakes simultaneously yields:
- Shorter stopping distance.
- Better stability, especially under heavy braking.
- More predictable deceleration in emergencies.
“Proper braking technique involves keeping the bike upright… and applying both brakes smoothly and simultaneously.”
🟡 2. The Danger of Using Only One Brake
If You Rely Only on the Rear Brake:
- You limit your braking force to ~30%.
- You fail to develop skill and muscle memory for using the front brake effectively.
- You may panic and overuse the front brake in an emergency, risking a front-wheel lock.
If You Rely Only on the Front Brake:
- You miss out on rear brake stability.
- The rear may lift or slide, especially on downhill or slippery surfaces.
“If you use the rear brake for normal stops, you may not have enough skill to use the front brake properly when you really need it.”
🟡 3. How to Use Both Brakes Correctly
1. Brake Smoothly & Progressively
- Do not grab the brakes suddenly.
- Begin with light pressure, then squeeze or press more firmly as the suspension compresses and grip increases.
2. Keep the Bike Upright
- Always try to brake in a straight line.
- Avoid braking while leaning unless you’re using advanced trail braking techniques.
3. Use Coordinated Control
- Front brake: Squeeze with your fingers (already covering the lever).
- Rear brake: Press with your foot gently but firmly.
- Both should be applied at the same time.
🟡 4. Braking with and without ABS
With ABS (Anti-lock Braking System):
- You can brake hard and confidently, as the system prevents wheel lock-up.
- Still, you must apply pressure progressively to maintain stability.
Without ABS:
- You must modulate brake pressure manually.
- If a wheel locks:
- Stay upright and straight.
- Hold the brake steady until the wheel regains traction or comes to a stop.
- Avoid slamming the brakes suddenly.
🟡 5. Practice Makes Perfect
- Use both brakes every time you slow down or stop.
- Build muscle memory for applying both controls together.
- Practice emergency stops in a safe environment so your reactions become instinctive.
✅ Tip 3: Maintain Proper Hand/Wrist Position
🟡 1. Why Hand and Wrist Position Matters
- Safe braking begins with correct posture — not just body posture, but hand and wrist alignment.
- Your wrist and hand must be in a position that:
- Allows you to roll off the throttle smoothly.
- Lets you reach the front brake lever quickly.
- Prevents accidental throttle input during braking.
“You can’t brake quickly or safely if your wrist position makes you fight the throttle.”
🟡 2. The Correct “Wrist Down” Position
What It Looks Like:
- Your hand, wrist, and forearm form a straight line when resting on the throttle and brake lever.
- The back of your hand stays level with your forearm — not angled up or bent down.
Why It Works:
- When reaching for the front brake, the natural wrist motion rolls off the throttle.
- This eliminates the risk of accidental acceleration while braking.
- The position allows faster reaction, as your fingers are already where they need to be.
“A straight line from your fingers to your arm will make you naturally close the throttle as you reach for the front brake.”
🟡 3. What to Avoid
- ❌ Cock-wrist position: Hand angled upward so that the wrist bends back.
- Risk: When you reach for the brake, the hand may twist the throttle open, not closed.
- ❌ Excessive downward bend: Overcorrecting with too steep an angle can feel awkward and fatiguing.
- ❌ Hovering with poor finger contact: Leads to unsteady grip and inconsistent brake pressure.
🟡 4. Recommended Grip Technique

2-Finger Brake Control
2-Finger Brake Control:
- Use your index and middle fingers to rest on or cover the front brake lever.
- Keep your ring and pinky fingers wrapped around the throttle grip.
- Your thumb and lower fingers stabilize your grip on the handlebars.
Coordinated Function:
- This split-finger grip allows you to:
- Roll off throttle and begin braking in one smooth motion.
- Maintain control of the bike even while braking hard.
Adjust the Lever:
- Make sure the brake lever is positioned to match your natural finger reach.
- If the lever is too high or too far away, it forces awkward wrist angles.
- Most levers are adjustable — take the time to set it correctly.
🟡 5. Practice and Muscle Memory
- In a parking lot or quiet area, practice:
- Wrist-down throttle position.
- Rolling off throttle while squeezing the brake.
- Emergency stops with this posture until it becomes second nature.
- The more you rehearse this posture, the quicker and more automatic your emergency responses become.
Conclusion
Stopping distance depends on awareness, technique, and bike condition. Ride at a pace that lets you stop within your sight, use both brakes smoothly, and keep your gear well-maintained.
Practice builds reflexes. Emergency stop drills sharpen your response—because even with ABS, good habits save lives when every foot counts.

Rodney L is a technical writer and product consultant with over a decade of experience in the motor industry. Rodney is a fan of performance machines that run fast and loud and an expert in all things custom. His numerous articles and write-ups are available at our knowledge base. Whether it’s something wrong with your motorcycle or you are building a custom bike, you can trust Rodney’s experience.
Subscribe
0 Comments
Oldest
You maybe like to read:
Best Adventure Bikes for Beginners (2026 Guide)
Adventure motorcycles, often called ADV bikes, are built to take you from smooth highways to rough backcountry trails. For new riders, picking the best adventure bikes for beginners can make all the difference. The right machine turns highways, gravel roads, forest tracks, and remote trails into places you actually want to explore, while the wrong […]
Best Motorcycle Intercom for Group Rides (2–20 Riders)
Riding in a group is thrilling, but without clear communication, even the best rides can turn chaotic. That’s where motorcycle intercom systems come in, letting you talk with your group, share GPS directions, listen to music together, and stay safer on the road. Whether you’re riding with a single friend or leading a pack of […]
Budget Motorcycle Intercoms from Fodsports: Honest 2026 Picks
I’ve used premium intercoms and budget ones on the same roads, in the same weather, on long touring days. The truth? Most riders don’t need a $400 system. Most riders still need the same basics: clear rider-to-rider talk, stable Bluetooth, and batteries that last a full day on the road. In 2026, budget motorcycle intercoms […]
2026 Best Motorcycle Intercom for Beginners from Fodsports
What is the best motorcycle intercom for beginners? If you’re a new rider, the idea of adding another piece of tech to your helmet can feel overwhelming. I’ve been using motorcycle intercoms for years—on solo rides, long tours, group trips, and daily commutes—and I’ll tell you this upfront: A beginner motorcycle rider doesn’t need the […]
Mesh Intercom vs Bluetooth Intercom: Which Motorcycle Communication System Is Better?
Mesh Intercom vs Bluetooth: Which Motorcycle Communication System Is Better? Mesh intercoms are best for riders who travel in groups because they automatically reconnect and stay stable, while Bluetooth intercoms are better for solo riders and two-up riding due to lower cost and simpler operation. As someone who both wrenches on bikes and rides long […]