Long-distance motorcycle touring is about freedom, rhythm, and endurance. Hours on the highway, changing weather, unfamiliar roads, and constant wind noise all test your gear — especially the communication system for touring. A touring motorcycle intercom is not the same as a short-ride or commuter intercom. On a multi-day trip, small weaknesses become big problems: […]
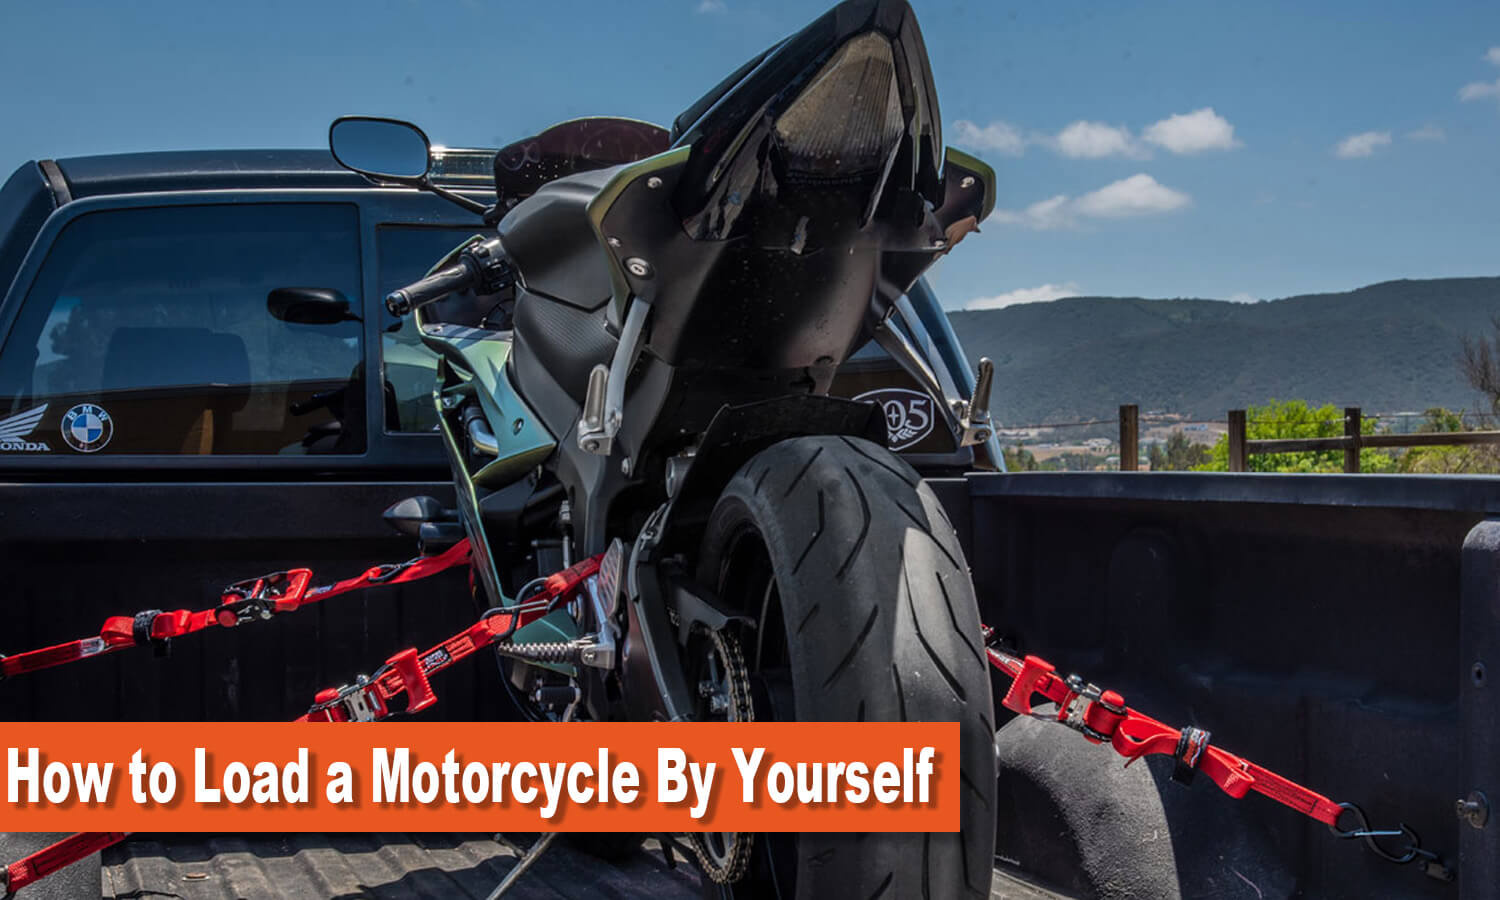
How to Load a Motorcycle by Yourself (Step-by-Step Guide)
Learning how to load a motorcycle by yourself can feel intimidating at first, especially when using a truck or trailer.
Many riders worry about dropping the motorcycle, losing control on the ramp, or strapping it down incorrectly.
The good news is that with the right setup and technique, loading a motorcycle solo is a safe, repeatable process that doesn’t require brute strength—just preparation and patience.
Table of Contents
Can One Person Load a Motorcycle Into a Truck or Trailer?
Yes, one person can load a motorcycle into a truck or trailer safely with the right ramp, proper setup, and controlled clutch use.
Whether you are loading a motorcycle into a pickup truck, utility trailer, or enclosed trailer, the core process is the same.
This guide explains how to load a motorcycle by yourself step by step, including ramp setup, riding or pushing the bike up, and securing it correctly.
Essential Gear to Load a Motorcycle by Yourself Safely
1. A truck or trailer with solid tie-down points
A pickup truck or motorcycle trailer with solid D-rings or bed loops is essential when loading a motorcycle by yourself.
2. A sturdy motorcycle ramp
The ramp should be long enough to keep the angle shallow and strong enough to support the full weight of your bike. It should also be wide enough to provide a stable surface for your feet if you lose momentum.
A longer, arched ramp is best, as it creates a gentler angle and eases the “breakover” when entering the vehicle. Tri-fold ramps or ramps over 10 feet long are good choices. Aluminum ramps with crossbars give tire traction.
3. Straps and tie-downs
Use four or more quality straps. Cam buckle straps with built-in soft ties are ideal. Straps should each have a safe working load of at least 500 lbs, and you should use them in opposing pairs (left/right, front/back).
4. A step or crate
A stoolbox or crate helps you step smoothly into the truck bed.
5. Wheel chock (optional but recommended)
A front-wheel chock can help secure the bike's front wheel and keep it straight while you tie it down. I consider a chock to be a minimum requirement for safety, especially on long trips. If you don't have a chock, you can wedge the front wheel against the corner of the truck bed for added stability.
6. Protective material
Rags or foam to cushion where straps rub painted surfaces. Also, gloves to protect hands from straps.
Step-by-Step: How to Load a Motorcycle by Yourself
This step-by-step guide shows exactly how to load a motorcycle by yourself into a truck or trailer, from setting up the ramp to tying the bike down and unloading safely.
Step 1: Choose the Right Loading Spot
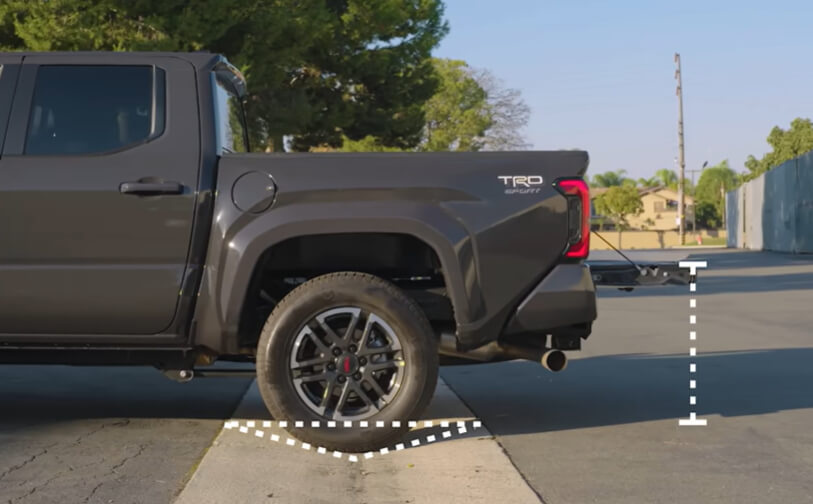
Choose the right loading spot
Before touching the ramp, take a moment to pick the best location. If possible, use a dip in the pavement, a gutter, or any feature that lowers the truck bed relative to the ground. Reducing the step-in height and ramp angle dramatically lowers the difficulty.
If that’s not an option, a flat parking lot works — you’ll need to be a bit more deliberate.
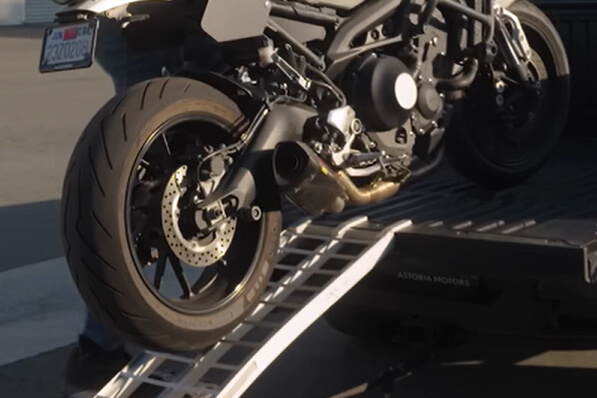
Step 2: Secure the Ramp and Load the Motorcycle Into the Truck or Trailer
This step focuses on ramp safety and the correct technique to load a motorcycle by yourself without losing control.
Most solo loading accidents happen when the ramp shifts or loses traction.
1. Secure the Ramp

position the motorcycle ramp slightly to one side of the center
Once you've chosen the location, securely install the ramp. Always position the ramp slightly to one side of the center. This gives you room to stand and walk the bike in. Attach the top of the ramp to the truck bed or hitch with a strap to prevent it from slipping while you load the bike.
Most pickup trucks allow you to thread a strap through the hitch receiver or D-ring. If possible, also secure the bottom of the ramp to the ground (e.g., by attaching it to the truck’s bumper) to further prevent slipping.
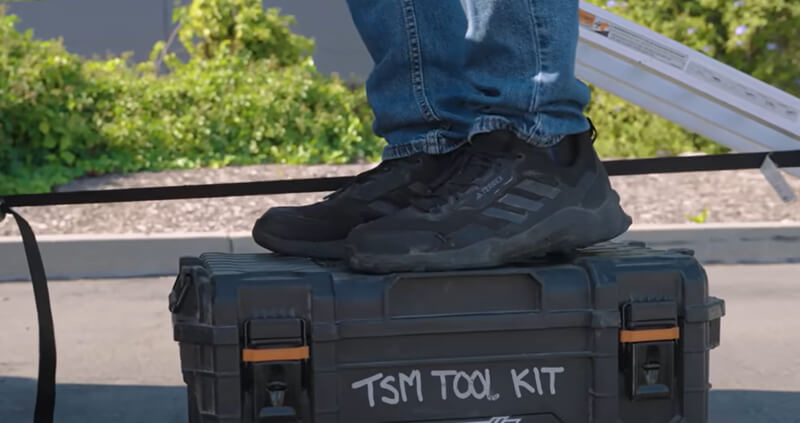
Place a toolbox beside the ramp for easier access
Next, place the toolbox or crate on the ground just beside the ramp’s entrance. This will allow you to step onto it easily, without overreaching, and make it easier to push or ride the bike into the truck bed. If you have a second ramp for the truck’s bumper or a built-in tailgate step, feel free to use those as well.
At this point, double-check everything: the ramp is securely in place, your straps are ready, and the step is stable.
Traction mats or crossbars on the ramp are crucial for safety, so test the grip of the ramp before moving the bike.
2. Ride the Bike Up the Motorcycle Ramp
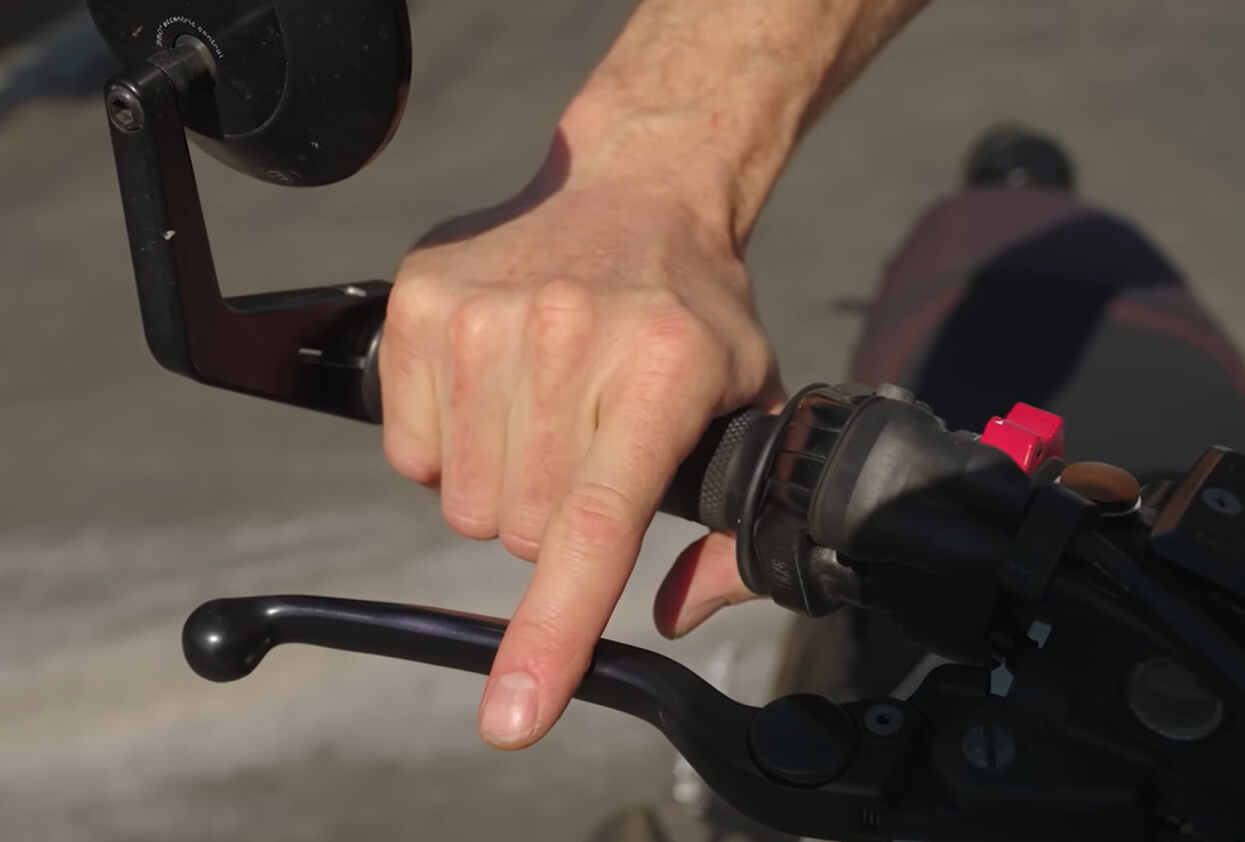
keep a finger on the front brake
This method allows one person to ride a motorcycle up a ramp and into a truck safely.
Before you begin, you should start the engine and hold the front brake. Align the bike with the ramp and leave it in second gear with the clutch out.
Aim for around 3,000–4,000 RPM to pull the bike up the ramp. Instead of using the throttle to control speed, you'll use the clutch lever.
Keep your eyes forward (avoid watching the front wheel) to help maintain balance. Gently release the front brake and let the throttle guide you slowly up the ramp.
Use the clutch to control speed
Key tips:
- Hold the throttle around 3,000–4,000 RPM
- Use the clutch to control speed
- Keep a finger on the front brake at all times
Once the front wheel reaches the truck bed, step up smoothly while the bike is still rolling. If you need to pause, pull in the clutch, apply the front brake, step up, then continue riding the bike fully into the bed. Once inside, shut the engine off and put the bike on its side stand to prevent damage. Position the front wheel in a chock or against the corner of the bed to prevent rolling.
How to Push the Motorcycle Up (Safest Way)
If you have a helper, one person can guide the bike on the ramp while the other pushes it up. Stand perpendicular to the bike for better leverage, keeping it balanced as it climbs. If you're on your own, put the bike in neutral, use the step for leverage, and proceed slowly over the breakover point. Pushing the bike is the easiest and safest way to load your bike into your truck, but it often requires two people.
Step 3: Tie the Bike Down Correctly
1. Use Low and Wide Anchor Points
The best tie-down points are low and spread wide, pulling the bike down and forward for maximum stability.
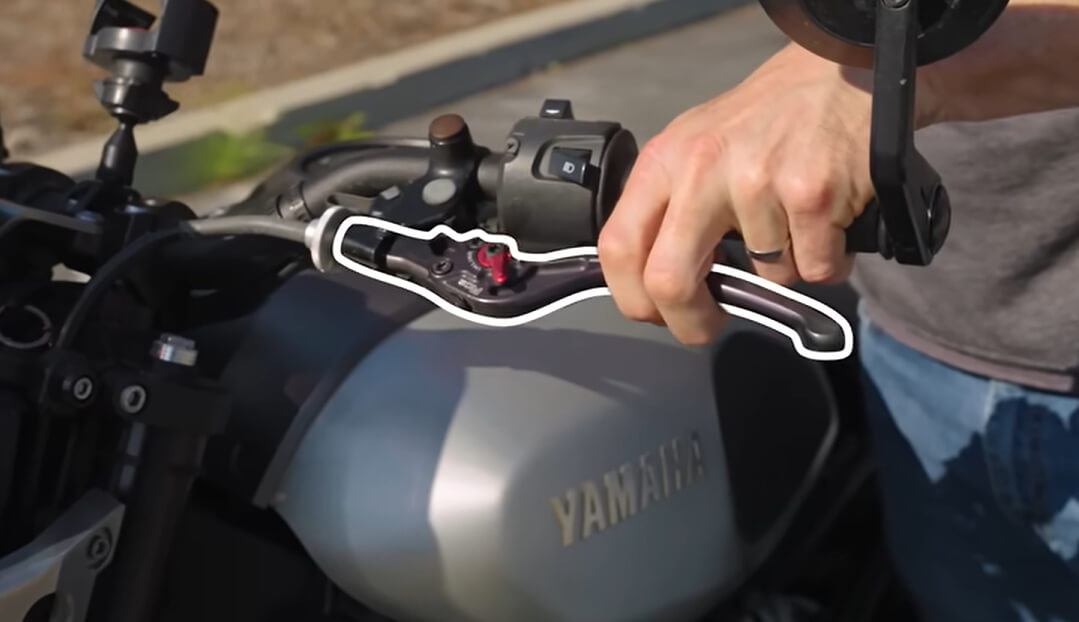
2. Best Front Tie-Down Location
best front tie-down location
The most secure place to strap a motorcycle is around the fork tubes near the lower triple clamp. This area is extremely strong, but take care not to pinch brake lines or wiring when routing soft ties.
If the lower triple clamp isn’t accessible (common on fully faired sport bikes), you can strap the handlebars — but only with a tool like a Canyon Dancer, which prevents grips from twisting or bars from bending.
3. Proper Strapping Sequence
- Leave the bike on the side stand.
- Take up slack on the left front strap, but keep it fairly loose.
- Move to the right side of the bike, pull it upright, and tighten the right front strap while compressing the front suspension.
- As the bike comes upright, the forks should compress about halfway, and both straps should be tight.
The motorcycle fork should compress about halfway
Once secured, give the bike a firm shove. If either strap goes slack, tighten it further.
Some riders tie a simple slip-knot or pinch the cam buckle to prevent straps from loosening with vibration.
Avoid tying the bike down while it’s leaning on the side stand. This puts unnecessary stress on the stand and prevents the suspension from absorbing bumps during transport.
4. Rear Straps (Optional)
Rear tie-downs are not always necessary. In many cases, a solid front tie-down is sufficient, especially if you drive smoothly. However, rear tie-downs can be helpful if your front anchors are not low and wide enough.
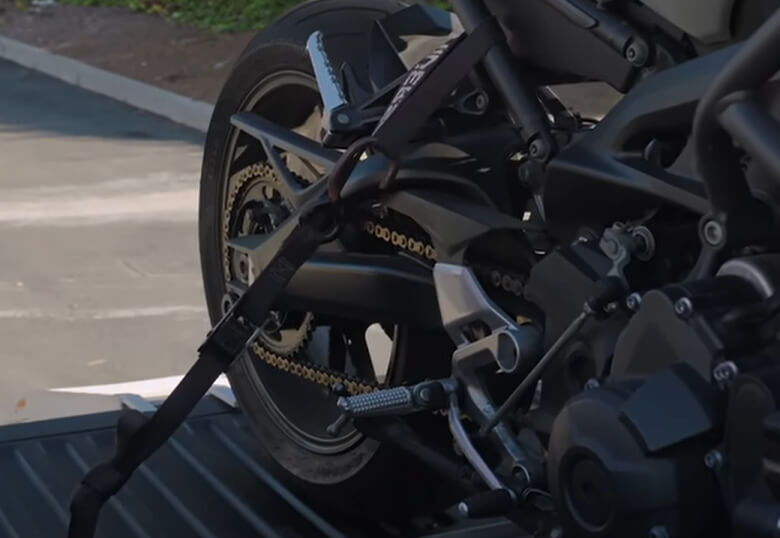
Attach the straps to the rear subframe
To secure the rear, attach the straps to the rear subframe, passenger footpeg brackets, or the swingarm. Pull the bike forward toward the front of the truck—do not pull the rear backward, as this could reduce the weight on the front wheel. When tensioning the rear strap, compress the rear shock about halfway. Be careful not to overtighten—just enough to preload the suspension.
If you have a wheel chock, use it. A chock locks the wheel in place and provides an additional anchor point for extra security.
Step 4: Drive Carefully
Wrap up any excess strap so it can’t flap in the wind or scratch paint. Wherever a strap touches painted plastic or metal, slip a rag underneath. Over long miles, even soft straps can rub through paint or fairings.
Place a rag under the straps
During transport, drive smoothly and conservatively. A motorcycle adds significant weight and raises your vehicle’s center of gravity, increasing braking distances and reducing maneuverability.
Driving and Transport Tips
With the bike secured, hit the road carefully. Your vehicle now carries extra weight (often 200–400+ pounds) high up, which affects braking and handling. Drive gently, as if the road were slick. Avoid sudden accelerations, hard braking, or sharp turns. Leave extra following distance and be ready for crosswinds or sway.
It’s wise to stop after a few miles to re-check the tie-downs. Straps can stretch or slip slightly, especially when new. Check that ratchets haven’t vibrated open or cam-buckles haven't slipped. If you gently push the bike and a strap slackens, tighten it down again immediately.
If you have shock-absorbing straps, you’ll have an easier time: those keep tension even when bumps try to “push” the bike back into the straps.
Step 5: Unload the Motorcycle
Unloading is simply the reverse process — with gravity doing most of the work.
1. Remove the rear straps if used.
Unhook any rear tie-downs if you used them. On the front straps, start by loosening one side slowly (usually the right side first).
Pulling the bike to release the strap tension
With cam straps, pull the bike toward you to take tension off the strap, then release the buckle a bit. With ratchets, unlock and gently ease the strap.
Don’t release one side fully at once, or the bike will tip. Instead, go a little on one side, then the other, gradually leaning the bike onto its side stand.
2. Lower the side stand.
As the straps loosen, the bike will lean. Once it tips enough, carefully let it rest on the side stand (if it didn’t already).
If it doesn’t have a center stand and is heavy, do this slowly and watch for stability.
It’s normal for it to feel a bit “lifted” when upright, so use the stand and your body weight to stabilize it.
3. Exit gear.
Put the bike back in first gear (this acts as a rolling block when you move it). Turn off the ignition if you haven’t already.
4. Walk the bike down.
Stand behind the bike in the truck bed and pull it back slightly until it’s resting on the side stand. Use one or two fingers to cover the front brake lever (this will control the bike's speed) and keep the clutch lever pulled in. Slowly walk the bike down the ramp, using the front brake to control its speed.
Make sure the rear wheel stays aligned with the ramp
Move carefully—don’t rush. Keep your eyes ahead (not focused on the ground) and make sure the rear wheel stays aligned with the ramp. Two fingers on the brake should be enough, applying gentle pressure (around 1–2%) to prevent the bike from rushing down.
If the bike starts to ride the brake or jerk, use the clutch to engage some low engine braking, but the front brake alone is usually sufficient.
- Use the front brake as your primary control
- Modulate with the clutch if needed
- Move slowly and stay aligned with the ramp
Once the bike is on the ground, you’re done.
Quick Summary: How to Load a Motorcycle by Yourself
- Use a long, secured motorcycle ramp
- Position the ramp slightly off-center
- Control speed with the clutch, not the throttle
- Compress the suspension halfway when strapping
- Unload using the front brake
Additional Tips for Safe Loading and Unloading
1. Use a wheel chock if possible.
A simple chock locked or bolted in place will keep the bike’s front wheel straight and braced. Without one, you must watch the front tire; any side-to-side movement could shift the bike. Even a 2x4 at the front wheel (as one tip has done) is better than nothing.
2. Know your ramps’ limits.
Never exceed the weight rating of your ramp, and make sure it’s properly supported. Don’t use a ramp that has only minimal contact.
3. Protect the truck bed.
For added safety, place a bed extender or wood blocks under the front wheel to stop it from rolling during transit.
4. Watch out for slippery surfaces.
If your ramps or truck bed are wet or icy, loading becomes much harder. Clean them or wait for dry conditions.
5. Ask for help if unsure.
Nothing wrong with enlisting another pair of hands. One person can hold the bike, another walk it, or ride it up. Even a friend spotting can prevent a fall.
Frequently Asked Questions
Can one person load a motorcycle into a truck?
Yes. With a long, secured ramp and proper clutch control, one person can safely load a motorcycle into a truck or trailer without excessive strength.
Is it better to push or ride a motorcycle up a ramp?
Both methods work. Riding up the ramp offers more control when done correctly, while pushing is safer for beginners or heavier motorcycles.
What type of ramp is best for loading a motorcycle by yourself?
A long, arched motorcycle ramp with a high weight rating and secure attachment points is best. Longer ramps reduce the angle, improve traction, and make solo loading much safer.
Final Thoughts
Loading a motorcycle by yourself isn’t about muscle — it’s about preparation, balance, and using the bike’s suspension correctly. Take your time, set up your ramp and tie-downs carefully, and don’t rush the process. A few extra minutes of caution can save you from costly mistakes. Master this skill once, and you’ll never hesitate to haul your bike again.
Recommended Reading
How to Transport A Motorcycle? Full Methods and Tips
How to Check and Replace Motorcycle Wheel Bearings
How to Lift a Fallen Heavy Motorcycle Safely
What is the Motorcycle Death Wobble and How to Prevent It
How to prevent motorcycle battery fires?
How to Fix Twisted Motorcycle Forks: A Mechanic's Step-by-Step Guide

Motorcycle mechanic, writer. Interested in motorcycle gear for years. Like to stay up to date with the newest products and techniques of the motorcycle.
Subscribe
0 Comments
Oldest
You maybe like to read:
Best Adventure Bikes for Beginners (2026 Guide)
Adventure motorcycles, often called ADV bikes, are built to take you from smooth highways to rough backcountry trails. For new riders, picking the best adventure bikes for beginners can make all the difference. The right machine turns highways, gravel roads, forest tracks, and remote trails into places you actually want to explore, while the wrong […]
Best Motorcycle Intercom for Group Rides (2–20 Riders)
Riding in a group is thrilling, but without clear communication, even the best rides can turn chaotic. That’s where motorcycle intercom systems come in, letting you talk with your group, share GPS directions, listen to music together, and stay safer on the road. Whether you’re riding with a single friend or leading a pack of […]
Budget Motorcycle Intercoms from Fodsports: Honest 2026 Picks
I’ve used premium intercoms and budget ones on the same roads, in the same weather, on long touring days. The truth? Most riders don’t need a $400 system. Most riders still need the same basics: clear rider-to-rider talk, stable Bluetooth, and batteries that last a full day on the road. In 2026, budget motorcycle intercoms […]
2026 Best Motorcycle Intercom for Beginners from Fodsports
What is the best motorcycle intercom for beginners? If you’re a new rider, the idea of adding another piece of tech to your helmet can feel overwhelming. I’ve been using motorcycle intercoms for years—on solo rides, long tours, group trips, and daily commutes—and I’ll tell you this upfront: A beginner motorcycle rider doesn’t need the […]
Mesh Intercom vs Bluetooth Intercom: Which Motorcycle Communication System Is Better?
Mesh Intercom vs Bluetooth: Which Motorcycle Communication System Is Better? Mesh intercoms are best for riders who travel in groups because they automatically reconnect and stay stable, while Bluetooth intercoms are better for solo riders and two-up riding due to lower cost and simpler operation. As someone who both wrenches on bikes and rides long […]