Long-distance motorcycle touring is about freedom, rhythm, and endurance. Hours on the highway, changing weather, unfamiliar roads, and constant wind noise all test your gear — especially the communication system for touring. A touring motorcycle intercom is not the same as a short-ride or commuter intercom. On a multi-day trip, small weaknesses become big problems: […]
Motorcycle Intercom Battery Replacement: A Complete Guide
Motorcycle intercom battery replacement is a common issue riders encounter after a few seasons of use. Over time, batteries can wear down, causing the intercom to die mid-ride, struggle to hold a charge, or shut down unexpectedly.
This complete guide breaks down everything you need to know about motorcycle intercom battery replacement, helping riders understand the signs, the process, and the best options for their unit.
Table of Contents
How to Replace a Motorcycle Intercom Battery
⚠️ Warning: This is a general guide. Always check your specific model first.
Tools to Replace a Motorcycle Intercom Battery

tools to replace a motorcycle intercom battery
- Small Torx screwdriver or Phillips screwdriver (depending on the model)
To remove the screws holding the intercom housing. - Plastic prying tools
To safely open the housing without scratching or damaging it. - Soldering iron (fine tip recommended)
For soldering the battery wires to the circuit board, if needed. - Thin-gauge solder
For making precise, secure electrical connections when installing the new battery. - Tweezers
Helpful for handling tiny connectors and wires inside the intercom. - Heat shrink tubing or electrical tape
To insulate and protect any exposed wires after soldering. - Precision knife or wire cutters
For trimming wires or cutting tape as needed. - ESD-safe work surface (recommended)
Protects the electronics from static electricity while working. - Replacement battery (correct voltage & size)
The new power source for your intercom. Make sure it matches the original specifications.
Tip: Choosing the Right Battery
- Voltage: Usually 3.7V, must match exactly
- Connector: Must match the original
- Size: Fit inside the housing
- Capacity: Slightly higher (up to 10–20%) is okay
- Chemistry: Only Li-ion or Li-Po batteries
- Warning: Large upgrades may cause overheating or shorten lifespan
Step-by-step guide for changing motorcycle intercom batteries safely
Replacing a motorcycle intercom battery is delicate but possible on some models.
Follow these steps carefully, use the proper tools, and handle lithium batteries with caution.
⚠️ Note: Battery replacement is recommended only for out-of-warranty intercoms. Opening the unit may permanently reduce water resistance.
Step 1: Power Off the Intercom
Make sure the intercom is fully powered off before starting.
Disconnect it from any charger to prevent short circuits.
Step 2: Remove Mounting Clips and Accessories
Take off any clips, mounts, or ear speakers attached to the unit.
This makes opening the housing easier and safer.
Step 3: Open the Housing Carefully
Remove all exterior screws using the correct screwdriver (usually Phillips or Torx).
Keep the screws organized for reassembly.
Use a plastic pry tool to gently separate the housing along the seam.
Work slowly around the edges to release snap-fit clips.
Be careful not to:
- Damage internal cables
- Tear or stretch the rubber gasket (critical for waterproofing)
Step 4: Note Battery Orientation and Connector
Before disconnecting anything, note:
- Battery position
- Connector type
- Wire polarity
Taking a photo at this stage is strongly recommended.
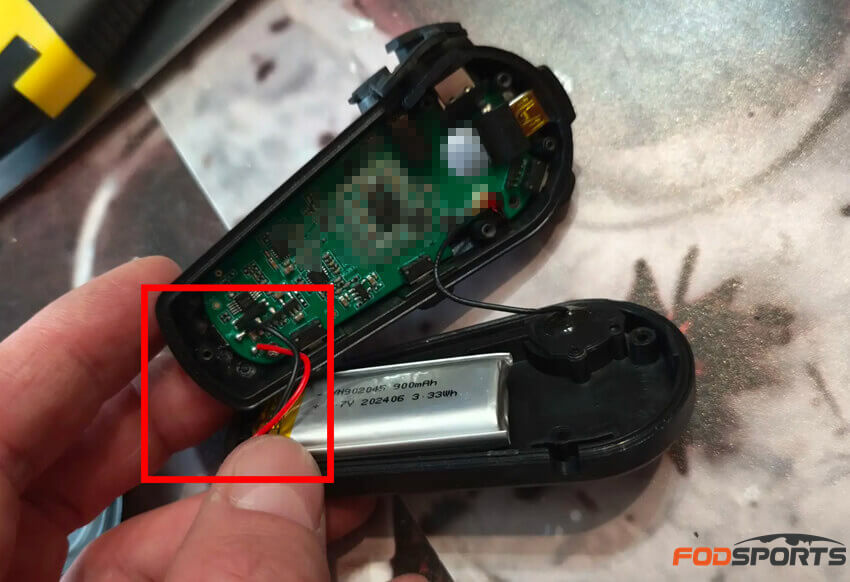
Check battery position and connector
Note: This image shows an older version of the intercom where the battery is soldered in place. The newer version has a removable battery with a plug-and-play connector, making it easier to replace the battery.
Step 5: Disconnect the Old Battery
If the battery uses a connector, press the locking tab and unplug it gently.
If the battery is soldered, carefully desolder the wires, noting polarity:
- Red = positive (+)
- Black = negative (–)
Step 6: Remove the Old Battery
Lift the battery out gently.
It may be held in place with adhesive or tape—peel it away slowly.
Do not:
- Pull on the wires
- Pry against the PCB
Step 7: Install the New Battery
Connect the new battery to the board or connector.
If soldering is required:
- Match polarity exactly
- Insulate solder joints with heat-shrink tubing or electrical tape
Secure the battery in its original position using fresh double-sided tape if needed.
Step 8: Preliminary Power-On Test
Before closing the housing, power on the intercom briefly.
Confirm that:
- The unit starts normally
- The battery is detected
Do not connect the charger yet.
If the unit does not power on, recheck the connector and polarity.
Step 9: Reassemble and Fully Charge
Reassemble the housing and reinstall all screws.
Make sure all seals and gaskets are properly seated.
Once reassembled, fully charge the intercom and verify normal operation.
Tips & SafetyWaterproofing
- Inspect rubber gaskets for cracks or damage.
- Replace worn adhesive tape inside the housing.
- Apply electronics-safe silicone sealant if necessary.
- Proper resealing prevents moisture damage.
Battery Safety
- Never puncture, bend, or crush lithium batteries.
- Do not mix batteries with different voltages.
- Avoid metal tools near exposed terminals.
- Stop immediately if the battery swells or heats up.
- Dispose of old batteries at a recycling facility.
Common Motorcycle Intercom Battery Designs
1. Internal Batteries (Most Common)
Most modern motorcycle intercoms use internal lithium-ion or lithium-polymer batteries.
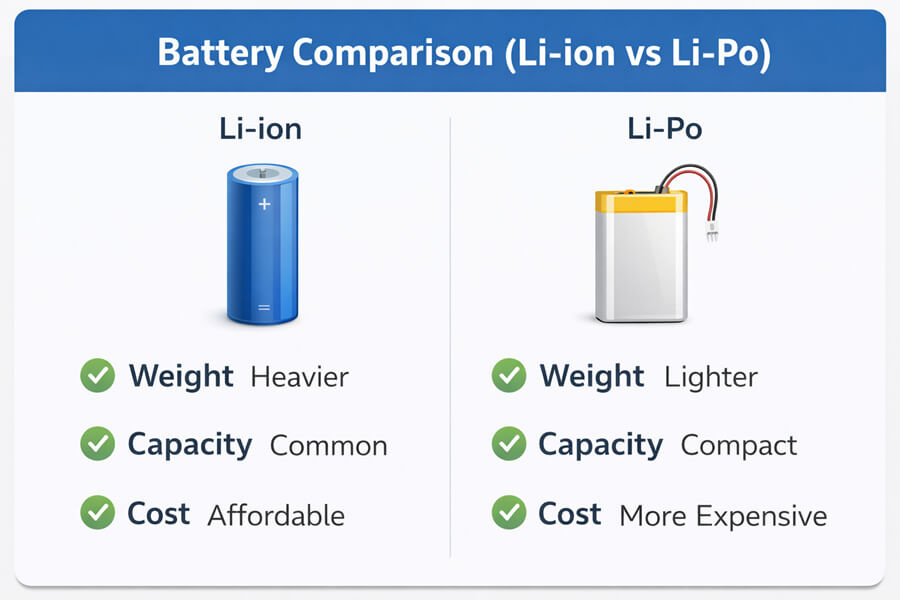
Battery Comparison
The battery is built inside the unit, so replacement is technically possible, but it requires opening the housing and is not officially supported by most manufacturers.
Pros
- Battery replacement is possible
- Cheaper than buying a new intercom
Cons
- Requires disassembly
- Risk of losing water resistance
- May void the warranty
2. Fully Sealed, Non-Replaceable Units
Some intercoms are designed as fully sealed units to maximize waterproofing and durability.
In these models, the battery is not intended to be replaced by the user.
Pros
- Better waterproof protection
- Compact, integrated design
Cons
- Battery replacement requires manufacturer service
- Often not cost-effective compared to buying a new unit
Why Motorcycle Intercom Batteries Fail Over Time
Motorcycle intercom batteries fail over time mainly because lithium batteries naturally degrade with age, charge cycles, heat exposure, and improper charging habits.
Most helmet intercoms use lithium-ion or lithium-polymer batteries, which are lightweight and powerful but have a limited lifespan.
Below are the most common reasons motorcycle intercom battery life shortens over time.
1. Charge cycle aging
Most lithium batteries last 300–500 full charge cycles before capacity drops noticeably.
Each time the battery is charged and drained, it loses a bit of capacity.
Many Li-ion cells are rated for roughly 1,000 full cycles before capacity falls to about 80%.
2. Natural aging (calendar aging)
All lithium-ion batteries degrade slowly even when not in use.
Internal chemical reactions happen over time and reduce capacity.
After a few years, the battery may simply wear out—much like a phone battery that dies quicker than it did when new.
3. Temperature extremes
High heat greatly accelerates battery aging and capacity loss.
Helmets left in hot cars or direct sunlight speed up battery wear. Avoid using or storing the unit outside the 15–25 °C range.
Very cold weather can also temporarily reduce performance until the battery warms up.
4. Overcharging or deep discharging
Frequently charging to 100% or draining to 0% reduces battery health.
Frequently letting the battery become completely discharged (or leaving it fully drained for a long time) can cause permanent damage.
5. Improper charging
Using the wrong charger or fast-charging can stress the cell. Manuals usually advise using the supplied charger to avoid damage.
Fast charging may trigger lithium plating inside the cell, which accelerates capacity loss.
6. Heavy usage and discharge habits
Continuously running the intercom at high volume or for long periods drains the battery quickly.
Over many rides, these stresses cause the battery’s effective life to shrink.
Signs Your Motorcycle Intercom Battery Needs Replacement
A motorcycle intercom battery usually needs replacement when it can no longer hold a charge, shuts off unexpectedly, or shows clear signs of lithium battery degradation.
Before opening your helmet or ordering replacement parts, it’s important to confirm that the battery—not the wiring or speakers—is actually the problem.
Below are the most common signs your motorcycle intercom battery is failing.
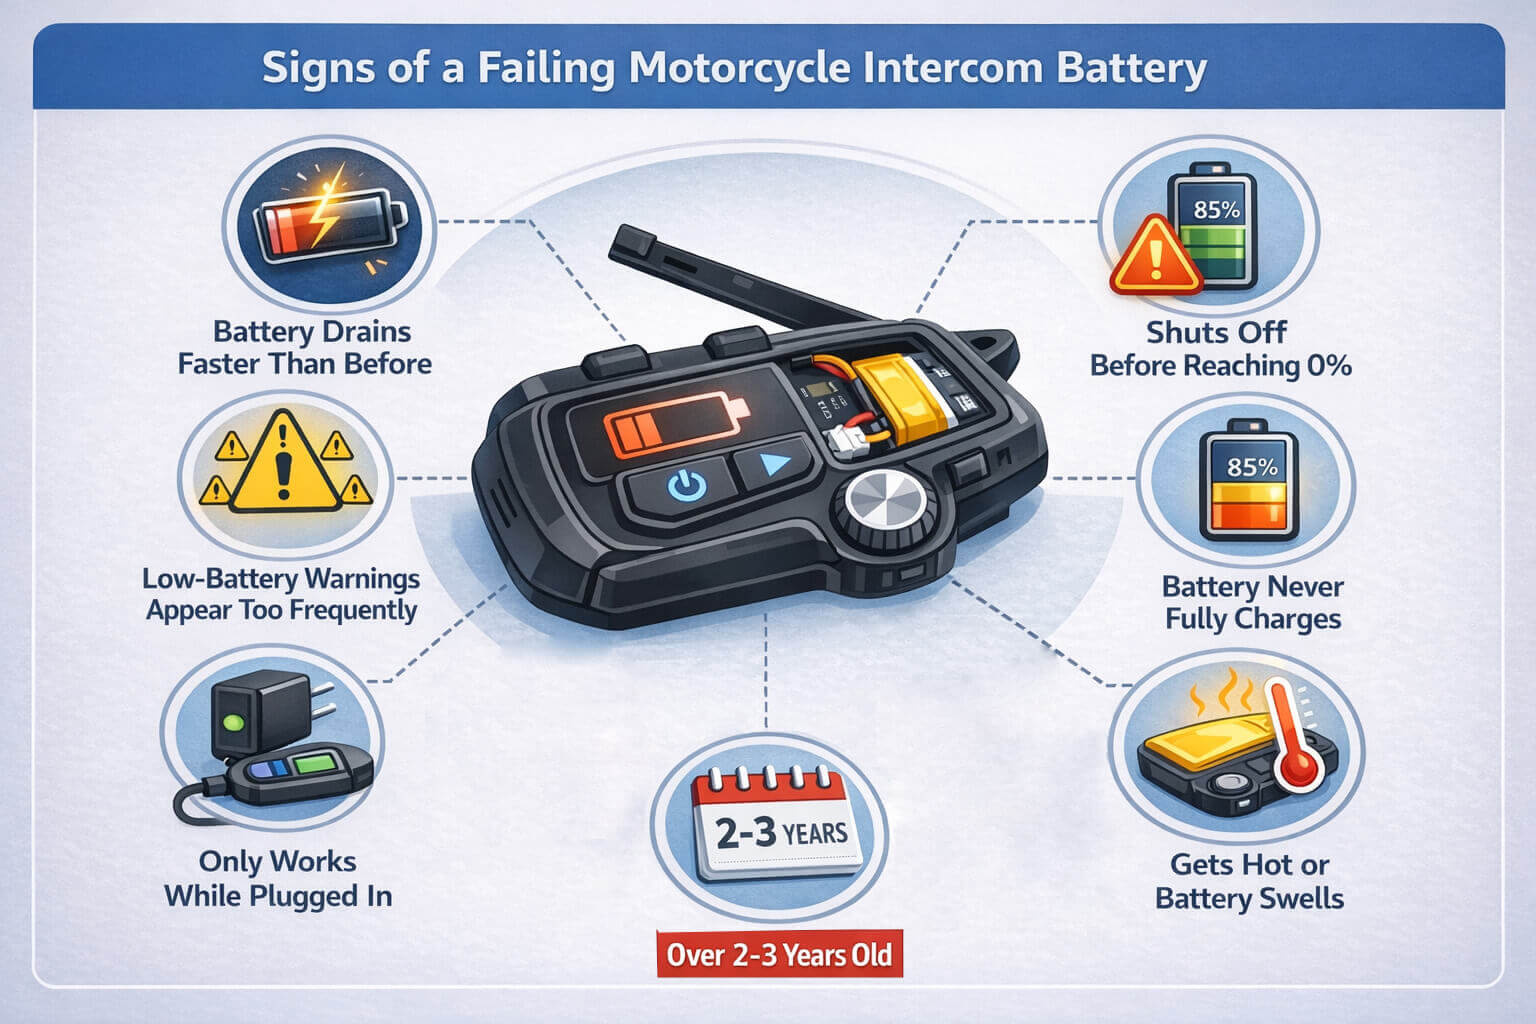
Signs of a failing motorcycle intercom battery
1. Battery life drops significantly
The intercom drains much faster than when it was new and no longer lasts a full ride.
For example, a unit that once ran 6–8 hours now only lasts 2–4 hours, which is a clear sign of battery degradation.
2. The intercom shuts off before reaching 0%
The device powers off at 40–60% battery or experiences random shutdowns during calls or music playback.
This happens when the aging battery can no longer deliver enough power under load.
3. The intercom only works while plugged in
The intercom functions normally when connected to a charger but shuts off immediately once unplugged.
This usually means the battery can no longer hold any usable charge.
4. The battery never fully charges
The battery never reaches 100%, or the charging indicator never turns green, even after several hours of charging.
This often indicates internal cell damage or capacity loss.
5. Low-battery warnings appear too frequently
Repeated “battery low” alerts appear even during short rides, suggesting inaccurate voltage readings caused by battery wear.
6. The intercom becomes hot or the battery looks swollen ⚠️
If the unit becomes unusually hot or the battery visibly swells, stop using it immediately.
A swollen lithium battery is a safety hazard and must be replaced.
7. The intercom is more than 2–3 years old
Most lithium-ion batteries in motorcycle intercoms begin to degrade noticeably after 2–3 years, even with normal use.
If your intercom is within this age range, battery wear is very likely.
Can You Replace a Motorcycle Intercom Battery?
Yes, you can replace a motorcycle intercom battery—but only on some models.
Most motorcycle intercoms today are built as sealed units. The battery sits inside a closed housing, not to make things difficult, but because we need that seal to protect the unit from rain, dust, vibration, and everyday riding conditions. Once the shell is opened, we can no longer guarantee the same level of waterproofing or long-term reliability.
Because designs vary, some intercom models can support battery replacement, while others are not recommended to be opened due to their internal structure and sealing method. That’s also why there isn’t a single yes-or-no answer that applies to every model.
If an intercom is already out of warranty, we understand why some riders consider replacing the battery themselves. Replacement lithium cells are available, and technically, it can be done. However, from our experience, there are trade-offs. Once the unit is opened, the original water resistance cannot be restored, and the final result depends entirely on the installation.
So the honest answer from us is: sometimes.
The safest option is always to check with us first. If riders aren’t sure, they can contact us directly, and we’ll help confirm whether battery replacement is possible for their specific model.
Contact Us for Battery Support
Battery Replacement vs Buying a New Intercom
Replace the Battery If:
- Intercom works perfectly otherwise
- Bluetooth and audio quality are still good
- Unit is less than 3–4 years old
Buy a New Intercom If:
- Battery replacement cost is high
- Intercom lacks modern features
- Buttons or speakers are failing
- Firmware is no longer supported
Cost of Motorcycle Intercom Battery Replacement
For older or more budget-friendly intercom models, battery replacement can make sense if you’re comfortable doing it yourself. Replacement batteries are usually inexpensive, making this a cost-effective way for DIY users to extend the life of the device.
That said, if professional labor is required, the total repair cost can quickly approach the price of a new unit. In those situations, upgrading to a new intercom is often the more practical and economical choice.
When it comes to high-end Mesh intercoms, battery replacement is generally not recommended. These models use more complex internal designs, and the cost, difficulty, and potential risks involved in battery replacement often outweigh the benefits. As a result, many riders choose to upgrade rather than repair.
If you’re unsure which option makes the most sense for your situation, a simple comparison between the estimated repair cost and the price of a new unit can usually clarify the decision.
And if you decide that purchasing a new unit is the better option, feel free to contact us. As a valued customer, Fodsports is happy to offer a discount code for repeat purchases.
How to Extend Your New Intercom Battery Life
Once you install a new battery, following these good habits can significantly extend its lifespan:
- Avoid charging to 100% every time
Charging to full capacity every time can stress the battery over time. Try to charge it when it reaches around 20-30%. - Do not store fully dead or fully charged
Storing a battery completely dead or fully charged can reduce its overall lifespan. Keep it within a mid-range charge. - Store at 40–60% charge for long periods
If you need to store your intercom for an extended period, make sure the battery is at 40-60% to prevent over-discharge or overcharge damage. - Keep the helmet away from extreme heat
Excessive heat can cause batteries to degrade quickly. Store your helmet in a cool, dry place. - Use certified chargers only
Using non-certified or cheap chargers can damage the battery and shorten its life. Always use the recommended charger.
These habits are essential for maintaining all motorcycle intercom batteries, ensuring they perform reliably for as long as possible.
Frequently Asked Questions (FAQ)
Q1: How long does a motorcycle intercom battery last?
🕑 A: 2–4 years, depending on usage and charging habits.
Q2: Can I replace a Cardo or Sena battery myself?
🔧 A: Technically, yes, for some models, but it’s not officially supported and may void the warranty.
Q3: Is battery replacement safe?
✔️ A: Yes, if done correctly using the correct battery and proper tools.
Q4: Can a bad battery damage my intercom?
⚠️ A: Yes, swollen or leaking batteries can damage internal circuits.
Q5: Where can I buy replacement batteries for motorcycle intercoms near me?
A:
📍 Local shops: Check with local electronics or motorcycle accessory shops.
💻 Online retailers: Amazon, eBay, or your intercom manufacturer’s website.
Q6: How much does it cost to replace a motorcycle intercom battery?
💰 A: DIY replacements typically cost $10–$30 for the battery.
🛠️ Professional repairs range from $40–$80.
Q7: What are the signs that my intercom's battery needs replacement?
🔋 A: If your intercom:
- Drains faster than before
- Shuts off unexpectedly
- Doesn’t hold a charge
- Shows signs of overheating/swelling
Q8: Can I replace the battery myself without voiding the warranty?
🛡️ A: It depends on the model. Some intercoms allow battery replacements without voiding the warranty, while others require professional service.
Q9: What’s the difference between Li-ion and Li-Po batteries for intercoms?
🔋 A:
- Li-ion: More common, reliable, and widely used.
- Li-Po: Lighter, more compact, but usually more expensive.
Conclusion
A failing battery doesn’t have to cut your ride short. Replacing it or upgrading your intercom can keep your gear performing reliably and your rides uninterrupted. The choice is yours, but the result is the same: clear communication, dependable performance, and the freedom to focus on the road ahead.
At Fodsports, we know every ride matters. Keep your equipment ready, ride smart, and enjoy the confidence that comes from knowing your intercom won’t let you down.
Recommended Reading

With over 10 years of experience working on cars and trucks Item Training Supervisor Richard Reina is known around the office as one of our technical experts & real an "automobile person".
His rate of interest began, in his very own words, "at the age of two when his father educated him the distinction in between a Chevy and a Ford. Since then it's been cars regularly."
As a serious lover of practically all things with a motor Richard can address nearly any kind of inquiry related to car upkeep, fixing, or restoration & is a fact professional in electric motor background.
Subscribe
0 Comments
Oldest
You maybe like to read:
Adventure motorcycles, often called ADV bikes, are built to take you from smooth highways to rough backcountry trails. For new riders, picking the best adventure bikes for beginners can make all the difference. The right machine turns highways, gravel roads, forest tracks, and remote trails into places you actually want to explore, while the wrong […]
Riding in a group is thrilling, but without clear communication, even the best rides can turn chaotic. That’s where motorcycle intercom systems come in, letting you talk with your group, share GPS directions, listen to music together, and stay safer on the road. Whether you’re riding with a single friend or leading a pack of […]
I’ve used premium intercoms and budget ones on the same roads, in the same weather, on long touring days. The truth? Most riders don’t need a $400 system. Most riders still need the same basics: clear rider-to-rider talk, stable Bluetooth, and batteries that last a full day on the road. In 2026, budget motorcycle intercoms […]
What is the best motorcycle intercom for beginners? If you’re a new rider, the idea of adding another piece of tech to your helmet can feel overwhelming. I’ve been using motorcycle intercoms for years—on solo rides, long tours, group trips, and daily commutes—and I’ll tell you this upfront: A beginner motorcycle rider doesn’t need the […]
Mesh Intercom vs Bluetooth: Which Motorcycle Communication System Is Better? Mesh intercoms are best for riders who travel in groups because they automatically reconnect and stay stable, while Bluetooth intercoms are better for solo riders and two-up riding due to lower cost and simpler operation. As someone who both wrenches on bikes and rides long […]