Long-distance motorcycle touring is about freedom, rhythm, and endurance. Hours on the highway, changing weather, unfamiliar roads, and constant wind noise all test your gear — especially the communication system for touring. A touring motorcycle intercom is not the same as a short-ride or commuter intercom. On a multi-day trip, small weaknesses become big problems: […]

Motorcycle Lane Positioning Guide
When riding a motorcycle, your lane position is one of the most powerful tools to stay safe, visible, and in control. Many riders underestimate its importance, yet the way you place yourself within a lane can mean the difference between avoiding danger and ending up in an accident.
This guide explores how to master lane positioning, when to use each option, common mistakes to avoid, and how to adapt in real-world conditions.
Table of Contents
Why Lane Position Matters
- Visibility: Motorcycles are slim and easy to miss. Choosing the right spot makes it harder for drivers to ignore you.
- Room to react: A smart position gives you a way out if a car drifts or traffic suddenly shifts.
- Hazard avoidance: Cars can roll over small debris or oil without issue; for a motorcycle, that same hazard can ruin your day.
- Influence: Your placement can subtly guide how drivers around you behave.
Think of it less like a fixed rule and more like a strategy in a game—every move changes what options you have next.
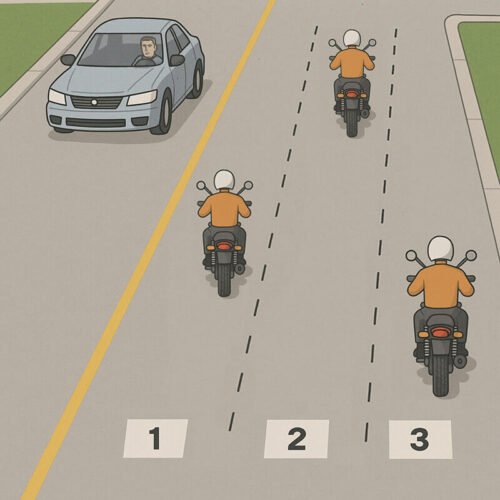
The Three Lane Positions
A helpful mental model is to break the lane into three zones:
- Position 1 (Left third): Closest to the centerline or yellow line
- Position 2 (Center third): In the middle of the lane
- Position 3 (Right third): Closest to the road edge or shoulder
Position 1: Left Side (Near the Centerline)
This is often the default choice for experienced riders.
Advantages:
- Maximum visibility to oncoming traffic.
- Best view ahead, especially around vehicles.
- Allows you to discourage cars from drifting into your lane.
Risks:
- Close to oncoming vehicles – dangerous if someone crosses the centerline.
- Less buffer if the car in front swerves left.
When to use it:
- On two-lane roads with moderate traffic.
- When you want to be clearly visible to oncoming cars.
- In flowing traffic, where you need a wide forward view.
Position 2: (Center of Lane)
This is often the least desirable choice, though many beginners naturally ride here.
Advantages:
- Equal spacing from both sides.
- Neutral position that feels natural to new riders.
Risks:
- Collects oil, coolant, and debris from cars. Especially slippery in the rain.
- Poor visibility – you can “blend in” with traffic and become invisible to cars.
- No clear escape route if danger comes from either side.
When to use it:
- Rarely, but it can be useful at very low speeds or in narrow lanes.
- When preparing to change lanes or merge, take a temporary neutral position.
Position 3: Right Side (Near the Curb or Shoulder)
This spot is often overlooked, but it has its role.
Advantages:
- Maximum buffer from oncoming traffic.
- Useful when passing large trucks – lets you avoid their wind turbulence.
- It can be safer on multi-lane highways where most vehicles are to your left.
Risks:
- Easily hidden in the blind spot of cars.
- Puts you near pedestrians, parked cars, and merging traffic.
- Reduced visibility to vehicles ahead and behind.
When to use it:
- On highways with multiple lanes, especially when slower traffic is merging from the right.
- When riding in the far-right lane and you want extra space from faster traffic.
Adapting Lane Position to Different Driving Environments
Three Lane Position
1. City Streets
Urban riding is full of unpredictable hazards: taxis pulling over, pedestrians stepping off curbs, and delivery trucks double-parked.
- Use Position 1 at intersections to be seen by oncoming cars turning left.
- Shift to Position 3 when avoiding buses or parked cars.
- Avoid Position 2 unless traffic or lane width forces you there.
2. Highways
High-speed environments require longer sight lines and buffer zones.
- In the left lane, Position 1 helps visibility and discourages cars from cutting in.
- Around trucks, use Position 3 to avoid wind turbulence and blind spots.
- Always keep an escape route to either shoulder or an open lane.
3. Curves and Winding Roads
Your lane position dictates your line of sight.
- Enter curves from the outside (Position 1 in left curves, Position 3 in right curves).
- Transition smoothly to the inside for the apex, then return to the outside.
- This widens your view, smooths your line, and reduces lean angle.
4. Intersections and Stoplights
Most motorcycle accidents happen at intersections.
- At red lights, stop in Position 1 or 3, not 2 – it keeps you visible and gives you space if a car approaches from behind too fast.
- Always watch your mirrors, keep the bike in gear, and plan an escape path (like moving between cars).
Common Mistakes Riders Make
1. Riding Too Long in Position 2
Many beginners “center up” because it feels symmetrical. But this exposes them to slippery conditions and makes them invisible.
Fix: Learn to treat Position 2 as temporary, not permanent.
2. Never Changing Position
Some riders stick to one side no matter the situation.
Fix: Lane position should be dynamic. Shift often to adapt to traffic, visibility, and hazards.
3. Ignoring Blind Spots
Even if you’re in the best lane position, you can vanish in a car’s mirror.
Fix: Always check mirrors, stay out of blind spots, and flash headlights or tap your horn when needed.
Advanced Defensive Techniques: Lane Positioning
1. Maintain a Buffer Zone
- Keep at least 2–3 seconds of following distance.
- On highways, extend this to 4–5 seconds.
- Side-to-side, leave at least half a lane of space from cars.
2. Always Have an Escape Path
Before committing to a lane position, ask: “If this car swerves, where do I go?”
- Shoulders, empty lanes, or gaps between cars can all be options.
- Keep scanning so you always know your exit.
3. Use Lane Position as Communication
- A slight shift toward Position 1 signals you may turn left.
- Hugging Position 3 shows the intention to exit or merge right.
- Your body language influences how drivers react.
Pro Tips for Staying Safe: Mastering Lane Position
- Scan far ahead: anticipate lane changes and road hazards early.
- Adapt constantly: treat lane position as fluid, not fixed.
- Avoid following directly behind vehicles: stagger slightly to see ahead.
- Practice in low-traffic areas: build muscle memory before tackling busy streets.
Quick Reference: Lane Positioning
- Position 1 (Left) → Best for visibility, general use, watch for oncoming traffic.
- Position 2 (Center) → Use only temporarily, avoid in wet conditions.
- Position 3 (Right) → Safer buffer from oncoming cars, but beware of blind spots.
Golden Rule: Stay visible, stay adaptable, and always leave yourself an out.
Conclusion
Mastering lane positioning is not about memorizing rules—it’s about thinking ahead, reading the road, and adapting in real time. By using each lane position strategically, you can stay visible, avoid hazards, and maintain control in any riding environment.
Your motorcycle gives you the agility that cars lack. Lane positioning is how you turn that agility into safety. Ride smart, ride visible, and make the road work for you.
Top 3 Motorcycle Dangers and Prevention Strategies

With over 10 years of experience working on cars and trucks Item Training Supervisor Richard Reina is known around the office as one of our technical experts & real an "automobile person".
His rate of interest began, in his very own words, "at the age of two when his father educated him the distinction in between a Chevy and a Ford. Since then it's been cars regularly."
As a serious lover of practically all things with a motor Richard can address nearly any kind of inquiry related to car upkeep, fixing, or restoration & is a fact professional in electric motor background.
Subscribe
0 Comments
Oldest
You maybe like to read:
Best Adventure Bikes for Beginners (2026 Guide)
Adventure motorcycles, often called ADV bikes, are built to take you from smooth highways to rough backcountry trails. For new riders, picking the best adventure bikes for beginners can make all the difference. The right machine turns highways, gravel roads, forest tracks, and remote trails into places you actually want to explore, while the wrong […]
Best Motorcycle Intercom for Group Rides (2–20 Riders)
Riding in a group is thrilling, but without clear communication, even the best rides can turn chaotic. That’s where motorcycle intercom systems come in, letting you talk with your group, share GPS directions, listen to music together, and stay safer on the road. Whether you’re riding with a single friend or leading a pack of […]
Budget Motorcycle Intercoms from Fodsports: Honest 2026 Picks
I’ve used premium intercoms and budget ones on the same roads, in the same weather, on long touring days. The truth? Most riders don’t need a $400 system. Most riders still need the same basics: clear rider-to-rider talk, stable Bluetooth, and batteries that last a full day on the road. In 2026, budget motorcycle intercoms […]
2026 Best Motorcycle Intercom for Beginners from Fodsports
What is the best motorcycle intercom for beginners? If you’re a new rider, the idea of adding another piece of tech to your helmet can feel overwhelming. I’ve been using motorcycle intercoms for years—on solo rides, long tours, group trips, and daily commutes—and I’ll tell you this upfront: A beginner motorcycle rider doesn’t need the […]
Mesh Intercom vs Bluetooth Intercom: Which Motorcycle Communication System Is Better?
Mesh Intercom vs Bluetooth: Which Motorcycle Communication System Is Better? Mesh intercoms are best for riders who travel in groups because they automatically reconnect and stay stable, while Bluetooth intercoms are better for solo riders and two-up riding due to lower cost and simpler operation. As someone who both wrenches on bikes and rides long […]