Long-distance motorcycle touring is about freedom, rhythm, and endurance. Hours on the highway, changing weather, unfamiliar roads, and constant wind noise all test your gear — especially the communication system for touring. A touring motorcycle intercom is not the same as a short-ride or commuter intercom. On a multi-day trip, small weaknesses become big problems: […]

Ultimate Guide to Ski and Snowboard Base Repair
Skis and snowboards inevitably pick up nicks and gouges from rocks, rails, and normal wear. With the right tools, you can perform most base repairs at home, including snowboard bottom repair. This snowboarding repair guide explains how to identify scratches and core shots, lists essential tools, and shows when to fix it yourself or take it to a pro.
Table of Contents
Common Base Damage and How to Identify It
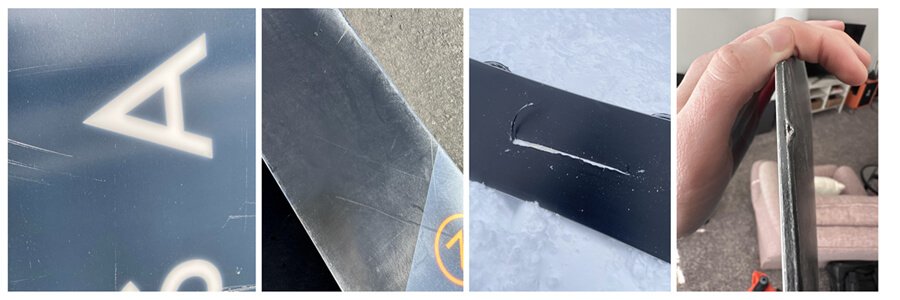
common case damage on skis and snowboards
1. Shallow Gouges
Depth & Appearance: Fine lines or nicks, usually less than 0.5 mm deep; appear as white streaks or light scratches on colored bases.
Feel: Slight edge or depression detectable by running your finger over the base.
Impact on Performance: Minimal; usually doesn’t slow you down.
Repair Tips:
- Hard to fill with P-Tex due to shallow depth.
- Scrape off raised edges using a metal scraper or razor.
- Apply fresh wax — often makes scratches nearly invisible.
- For many fine scratches or perfectionists, a professional stone grind can fully remove shallow damage.
2. Medium Depth Gouges
Depth & Appearance: Cuts ≥1 mm that do not penetrate through the base; base material is missing, but underlying fiberglass or wood remains intact.
Shape: Often V-shaped or U-shaped divots.
Cause: Small pebble impacts are common.
Repair Tips: Can usually be repaired at home using melted P-Tex — one of the easiest ways to fix snowboard base damage.
3. Core Shot Snowboard and Deep Gouges
Definition: Gouges that penetrate through the fiberglass layer into the core (usually wood).
Appearance: Exposed fiberglass strands or wood grain; metal edges may be cracked.
Risk: Water damage to the core if not properly sealed.
Repair Tips:
- Small core shots (narrow cuts) may be repaired at home with careful preparation.
- Large core shots (>1 square inch) are best handled by professionals.
4. Edge Damage
Indicators: Bent or nicked metal edges, dents, burrs, rust, or shiny/glinting spots from work-hardened steel.
Inspection: Use a bright light at an angle; run a diamond stone or fingernail along the steel to feel rough spots.
Repair Tips:
- Minor burrs or rust can be polished out, but if the damage extends to the base, you’ll need to fix the snowboard base first before tuning the edges.
- Major dents or missing sections require professional repair.
🛠️ Snowboard and Ski Base Repair Tools
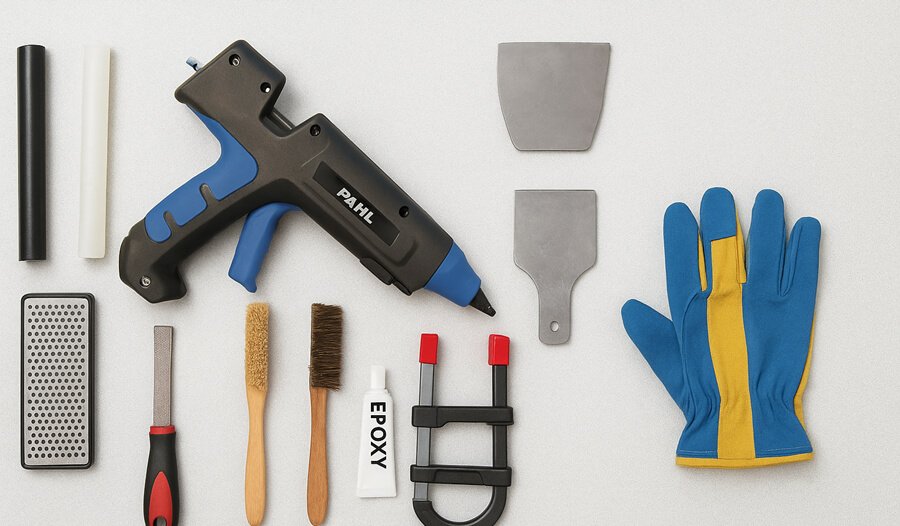
snowboard and ski base repair tools
These are the essential tools and materials you’ll need for any DIY snowboarding repair project.
1. P-Tex Sticks or Candles
Purpose: P-Tex sticks are commonly used for snowboard bottom repair and to fix snowboard base scratches or gouges.
Types:
- Standard P-Tex (black or clear): Common type, melted with a lighter or repair gun.
- Sintered P-Tex Rods / Base-Weld Wire (e.g., “Slick Sticks”): Contain epoxy for stronger bonding, ideal for deeper or larger repairs.
2. P-Tex Repair Iron or Hot Gun
Purpose: Melts P-Tex evenly into the damaged base.
Advantages: Provides controlled, consistent heat for clean, durable repairs.
Alternative: If you don’t have a repair iron, you can use a P-Tex candle and lighter, though results may be rougher.
3. Metal Scrapers
Purpose: Levels the repaired area after P-Tex has cooled.
Recommended Tools:
- Surform Tool: A small grater-style tool for quickly removing excess P-Tex.
- Steel Scraper: Used afterward to create a smooth, flat finish on the base.
4. Edge Files and Diamond Stones
Purpose: For repairing and sharpening steel edges — essential tools for any edge repair snowboard work.
Tools:
- Metal File (8–10″) with File Guide: Ensures a precise edge bevel.
- Diamond Stones (200–400 grit): Removes burrs and polishes edges.
- Pocket Diamond Stone: Handy for quick edge touch-ups on the hill.
5. Base Cleaner and Brushes
Purpose: Cleans the base before any repair work.
Procedure:
- Apply base cleaner or wax remover and let it dry for about 15 minutes.
- Wipe off residue and scrape away loose material.
- Use a stiff nylon or brass brush to clean wax and debris from scratches.
6. Epoxy or Glue
Purpose: Used to seal exposed cores or attach base patches.
Recommendation: Use a strong two-part or marine-grade epoxy (e.g., JB Weld).
Application: Bonds damaged core fibers or secures P-Tex sheet patches in large repairs.
7. Clamps or Vise
Purpose: Holds parts in place while the epoxy cures or repairs set.
Recommendation: Small C-clamps or a ski vise work well to stabilize the ski during repair.
8. Safety Gear
Safety Notes:
- Work in a well-ventilated area to avoid fumes from P-Tex or epoxy.
- Wear gloves when handling epoxy or hot tools.
- Use eye protection when scraping or filing.
- Always unplug irons or torches when not in use.
Ski and Snowboard Base Repair
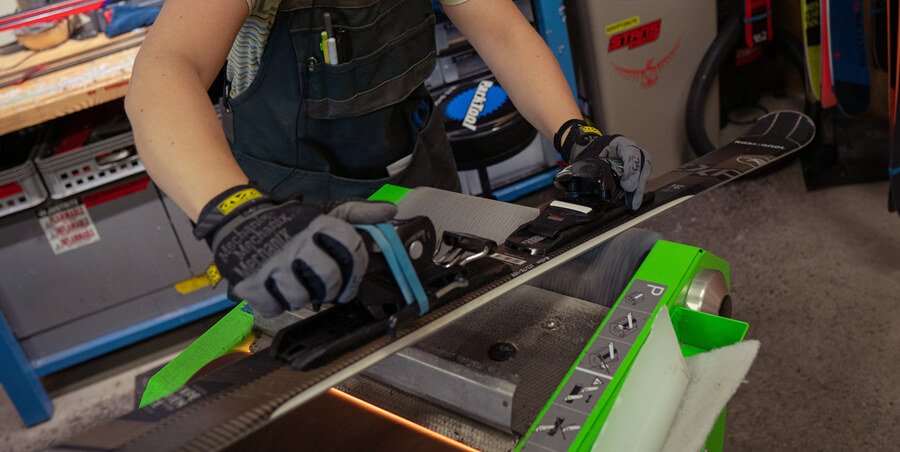
Check your skis and snowboard base carefully.
Repairing Shallow Gouges
Step 1: Clean the Base
- Wipe the base thoroughly with a clean cloth.
- If the surface feels waxy or dirty, use a base cleaner.
- Scrape away any loose plastic or debris using a scraper or single-edge razor blade.
Step 2: Remove High Spots
- For superficial scratches (less than 0.5 mm deep), filling may not be necessary.
- Carefully shave off any raised edges or loose flaps of plastic with a razor blade or scraper to make the area smooth.
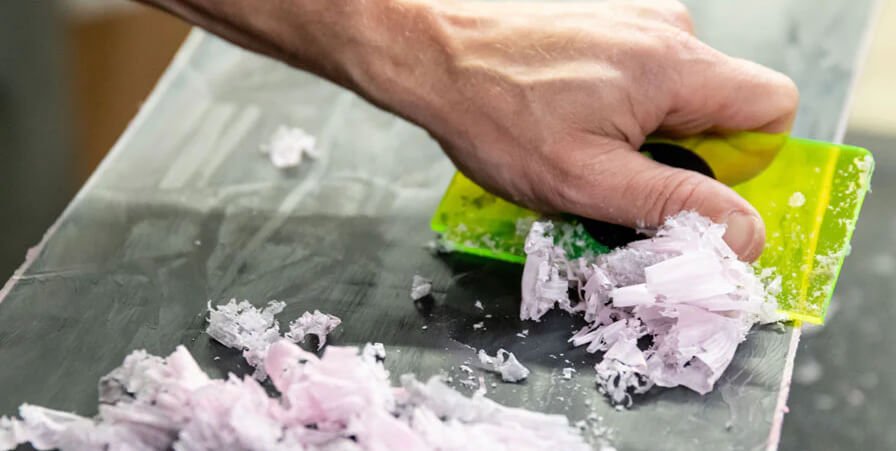
Step 3: Apply Hot Wax
- After cleaning and smoothing, apply a generous coat of hot wax over the scratch.
- Allow the wax to cool completely.
- Scrape off the excess wax until the surface feels even.
- In most cases, the wax will fill or hide the shallow scratch effectively.
Step 4: (Optional) Professional Base Grind
- If there are many small scratches or you want a perfectly smooth finish, take your board to a shop for a professional stone grind.
- This process evenly removes a thin layer from the base for a like-new surface.
Tip: Minor, fine scratches can often be left alone — regular hot waxing will usually fill them enough that they won’t affect glide or performance.
Filling Medium Depth Gouges with P-Tex
Step 1: Prep the Base
- Clean the damaged area thoroughly to remove all wax, dirt, and debris.
- Use a sharp scraper or knife to cut away any loose or frayed base material.
- Make sure the edges around the gouge are solid so the P-Tex can bond properly.
Step 2: Light the P-Tex
- Choose a P-Tex stick (black or clear to match your base).
- Ignite one end with a lighter and maintain a small blue flame—avoid large orange flames, as they produce soot.
- When the tip becomes soft and gooey, it’s ready to drip.
Step 3: Drip the P-Tex
- Slowly drip the molten P-Tex into the gouge(this step is the heart of any ptex snowboard repair).
- Keep the flame just at the tip of the stick and rotate it to control the flow.
- Slightly overfill the gouge so the repair sits above the base level.
- For deep gouges, apply the P-Tex in layers—let each layer cool before adding the next.
- Work in a well-ventilated area.
Step 4: Cool and Scrape
- Let the P-Tex cool completely (about 30 minutes).
- Use a Surform shaver or razor blade to remove excess material.
- Then use a sharp metal scraper to level the repair flush with the base.
- Check your work using a straightedge or by sight to ensure it’s even.
Step 5: Finish the Base
- Smooth any ridges with a fine file or stone.
- Apply hot wax to the entire base to seal and condition the repaired area.
- Once cooled, scrape and brush the wax for a smooth finish.
Note:
P-Tex candles are convenient but softer than the factory base, so they wear faster.
For a stronger, longer-lasting repair, use a P-Tex iron or gun with quality P-Tex wire.
Repairing Core Shots and Deep Gouges
Use a scraper to clear the damaged area
Step 1: Clean and Assess
- Remove all dirt, wax, and debris from the damaged area using a scraper.
- Examine the exposed core.
- If you find splinters of wood or fiberglass sticking out, either epoxy them back in place or remove them cleanly for a solid repair surface.
Step 2: Seal the Core
- Before applying any P-Tex, seal the core to prevent moisture damage.
- Use a strong waterproof epoxy (such as marine epoxy or JB Weld).
- Press the epoxy into any cracks or exposed areas of wood or fiberglass.
- Allow the epoxy to cure completely—typically 24 hours—to ensure a waterproof barrier.
Step 3: Cut Out the Damaged Base (Optional, for Large Areas)
- If the damaged section is larger than about 1 inch (2.5 cm), it’s often best to cut it into a clean, simple shape (square or rectangle).
- Use a sharp knife and template to cut straight edges around the gouge.
- Remove any loose or ragged base material within the outline.
Step 4: Glue in a P-Tex Patch (for Large Damage)
- Cut a piece of sintered P-Tex sheet slightly larger than the hole.
- Make sure the rough side faces downward—the epoxy adheres better to it.
- Apply epoxy to the edges of the cut-out and press the patch into place.
- Clamp the patch flat using wooden blocks or metal plates.
- Leave it clamped until the epoxy cures completely (check product instructions for curing time).
- Once cured, scrape the patch flush with the base and wax over it.
Step 5: Melt P-Tex (for Small Core Shots)
- For narrower or shallow core shots, follow the standard P-Tex snowboard repair method after sealing the core.
- Remember: P-Tex alone doesn’t bond well to wood or metal, so sealing first is essential.
- For better adhesion near metal edges, mix in Metalgrip repair string or use epoxy-infused P-Tex rods (“welding” sticks).
- These materials melt and bond more strongly than regular P-Tex candles.
Step 6: Finish the Repair
- Once the patch or P-Tex fill has cured, trim and scrape the area level with the rest of the base.
- If the base is heavily worn and not perfectly flat, consider a professional stone grind to even it out.
- Finish by hot waxing and brushing the entire base for smooth glide and protection.
Step 7: Know When to Seek Professional Help
- If the core shot extends into the edge, covers a large area, or you can clearly see wood or fiberglass, it’s best to take it to a ski shop.
- Shops use base-welding machines that fuse plastic at higher temperatures for a stronger, longer-lasting repair.
Note:
If the damage is larger than a quarter or exposes wood, go to a pro.
Professional repairs typically cost $20–30 and provide a durable, factory-quality finish.
Fix Snowboard Edge
When your ski or snowboard base takes a hit, the metal edges often suffer too. Follow these edge repair snowboard steps to fix and maintain your edges at home.
Step 1: Remove Burrs
- Check for sharp burrs or rough spots along the metal edges—these are usually caused by rocks or regular wear.
- Use a coarse diamond stone to smooth them out.
- Hold the stone flat against the edge and make a few light, even strokes along its length.
- You’ll feel and hear the edge transition from rough to smooth as the burrs are removed.
- Avoid pressing too hard—remove burrs, not steel.
Step 2: Sharpen and Bevel the Edges
- Once the burrs are gone, use a file and file guide to reset or maintain the bevel.
- Most skis have a side-edge angle of 88° or 89° (check your manufacturer’s specs).
- Secure the file guide on the ski, place the file in it, and push along the edge in smooth, continuous strokes from tip to tail.
- Repeat until the edge feels uniformly sharp.
- If needed, lightly file the base edge using a base-edge guide (usually 0.5°–1°), though this is less common for recreational skis.
Step 3: Polish the Edges
- After filing, polish to remove any fine burrs left by the file.
- Use a 200–300 grit diamond stone (or finer) in the same guide and make light, even passes along the edge.
- For a mirror finish and maximum sharpness, progress through finer stones (400–600 grit).
- Regularly inspect edges—if you store skis in damp places, burrs can reappear overnight.
- A pocket diamond stone is handy for quick touch-ups at the hill.
Step 4: Fix Bent or Broken Edges
- Bent edge: Gently bend it back into shape using pliers or a light tap with a hammer on a solid surface or in a vise.
- Apply a bit of epoxy to seal any visible cracks and clamp until cured.
- Broken or missing edge: If a section of edge is split out or missing, it usually requires cutting out the damaged area and installing a replacement edge strip—this should be done by a professional technician.
Step 5: Know When to Visit a Shop
- If the edges are severely bent, deeply gouged, or peeled away from the base, home repair may not restore full performance.
- A ski shop can perform a stone grind to flatten the base and machine-tune the edges for perfect sharpness and uniformity.
- Professional service is often faster, cleaner, and cost-effective for serious damage.
Step 6: Maintain Daily Edge Care
- Before or after each ski day, run a gummy stone or fine diamond stone lightly along both edges to keep them burr-free.
- Always dry your skis thoroughly and apply wax after skiing, especially in wet or slushy conditions—this protects both the base and the edges from rust and corrosion.
Comparing Repair Methods: P-Tex vs Base Welding
| Method | Overview | Pros | Cons | Best Use |
|---|---|---|---|---|
| P-Tex Candles | Simple, low-cost DIY melt-in repair. | Quick and easy for small scratches. | Weaker bond; may leave carbon spots. | Minor gouges not reaching the core. |
| P-Tex Repair Iron / Gun | Controlled heat tool for cleaner melting. | Stronger, more uniform repair. | Needs proper P-Tex sticks; slower process. | Small to medium base damage. |
| Air Welder / Hot Glue Gun (Base Weld) | Shop-grade fusion using weld rods with epoxy. | Very strong, long-lasting repair. | Requires skill and specialized tools. | Deep gouges or core shots. |
| Epoxy vs P-Tex | Used for bonding or sealing core areas. | Excellent adhesion for patches. | Too hard and brittle as a surface filler. | Core sealing and patch gluing. |
Safety Tips and When to Seek Professional Help
Seek professional help for ski and snowboard base repair
Ventilate
Always work in a well-ventilated area. Melting P-Tex releases fumes that are best not inhaled.
A window or fan is advisable. A simple dust mask helps for sanding or filing edges.
Protective Gear
Wear gloves when handling hot tools or epoxy. Be careful with hot irons and torches to avoid burns.
Eye protection is wise when filing edges or cutting base material.
Pro vs. DIY
- Minor damage: Small scratches or gouges can be fixed at home with P-Tex.
- Major damage: Large core shots, split edges, or deep multiple gouges should go to a ski shop.
- Why pros help: They have stone grinders, strong base welders, and the experience to make repairs last.
- Tip: If you’re unsure—or think a repair might make things worse—let a professional handle it. Even experienced skiers do small fixes at home but still get a full tune once a season.
Conclusion
Regular waxing and snowboard bottom repair keep your board fast, smooth, and protected from long-term damage. With patience and the right tools, you can easily handle most minor to medium repairs at home — saving money and extending the life of your gear.
For larger core shots, edge damage, or structural issues, professional repair is the smarter move. Tune shops have the equipment and experience to restore your base to near-factory condition, ensuring durability and top performance.
Whether you prefer to DIY or schedule a seasonal tune-up, consistent care is key. Keep your base clean, waxed, and smooth — and your gear will reward you with better glide, control, and confidence on every run.
Related Reading

With over 10 years of experience working on cars and trucks Item Training Supervisor Richard Reina is known around the office as one of our technical experts & real an "automobile person".
His rate of interest began, in his very own words, "at the age of two when his father educated him the distinction in between a Chevy and a Ford. Since then it's been cars regularly."
As a serious lover of practically all things with a motor Richard can address nearly any kind of inquiry related to car upkeep, fixing, or restoration & is a fact professional in electric motor background.
Subscribe
0 Comments
Oldest
You maybe like to read:
Adventure motorcycles, often called ADV bikes, are built to take you from smooth highways to rough backcountry trails. For new riders, picking the best adventure bikes for beginners can make all the difference. The right machine turns highways, gravel roads, forest tracks, and remote trails into places you actually want to explore, while the wrong […]
Riding in a group is thrilling, but without clear communication, even the best rides can turn chaotic. That’s where motorcycle intercom systems come in, letting you talk with your group, share GPS directions, listen to music together, and stay safer on the road. Whether you’re riding with a single friend or leading a pack of […]
I’ve used premium intercoms and budget ones on the same roads, in the same weather, on long touring days. The truth? Most riders don’t need a $400 system. Most riders still need the same basics: clear rider-to-rider talk, stable Bluetooth, and batteries that last a full day on the road. In 2026, budget motorcycle intercoms […]
What is the best motorcycle intercom for beginners? If you’re a new rider, the idea of adding another piece of tech to your helmet can feel overwhelming. I’ve been using motorcycle intercoms for years—on solo rides, long tours, group trips, and daily commutes—and I’ll tell you this upfront: A beginner motorcycle rider doesn’t need the […]
Mesh Intercom vs Bluetooth: Which Motorcycle Communication System Is Better? Mesh intercoms are best for riders who travel in groups because they automatically reconnect and stay stable, while Bluetooth intercoms are better for solo riders and two-up riding due to lower cost and simpler operation. As someone who both wrenches on bikes and rides long […]